Restoration Write-up..what it takes

powerstroker66

New member
Joined
Nov 12, 2012
Messages
236
Reaction score
0
Location
pipersville, PA
All right guys im going to start a thread here on my truck restoration project. It should be a wake up call for some of you guys that are considering in doing the same thing, this should put in perspective what it takes to do these trucks the right way and not paint rust!

Truck started out as a 95' ECLB truck that had 200k on it and living in the NE its life it certainly saw its amount of rust.
IMG_0225_zpsa7c8a999.jpg


IMG_0231_zps8bfd92c8.jpg


IMG_0232_zps5336e001.jpg


IMG_0229_zpse0bb1350.jpg


IMG_0228_zpse1615a13.jpg


IMG_0227_zps428119dd.jpg


Truck doesn't look terrible right? WRONG check out what i ran into when the bed came off....

IMG_0234_zpsf5d59637.jpg


IMG_0235_zps7dab1ddf.jpg


IMG_0236_zpsbc38998f.jpg


IMG_0237_zps767f7d7a.jpg


IMG_0238_zpseca33b6f.jpg


Once i saw this it was no longer going to be a quick job...at this point everything had to be gutted from the frame...

IMG_0242_zps49fd5182.jpg


IMG_0243_zps7dbc77a7.jpg


IMG_0244_zpsf4f7ea0d.jpg


once it was down the the frame where the bad rust was it was time to tackle the front end. Once again it wasn't going to just be a "replace the fender" job..after seeing the condition of the Rad support, i decided i would strip the front end as much as i could.

IMG_0252_zps4d7cef3d.jpg


IMG_0253_zps125f95a4.jpg


IMG_0255_zpsc4cd7243.jpg


IMG_0258_zps713da600.jpg


IMG_0259_zpse774e172.jpg


alright so now that the truck was as striped as i wanted to go in order to sand blast the rust i decide it was about that time.

IMG_0269_zpsb534076a.jpg


IMG_0273_zpsd79c1845.jpg


IMG_0274_zps48e25cc3.jpg


After 6 hours of sand blasting in 98 degree weather the truck was basically rust free for the first time in 15 years. everything got blasted including cab corners, inner fenders, tanks, leafs, all misc. brakets etc. etc. Then i started the task of painting, a 2 part PPG epoxy primer is the way to go for bonding the best. The from the cab back where the frame was pitted u used 3M shutz to coat it and give it texture. For the rest of the truck i used a 3-part urthane. I know all of you guys love POR 15 but when you break down the science of it its still a single stage paint that has limited durabilty in relivance to a 2 or 3 part activated system.

IMG_0275_zps10ab1464.jpg


IMG_0294_zpsbd42eba6.jpg


IMG_0295_zps93d58842.jpg


IMG_0296_zpsc9160f78.jpg


once it was curred it was time to start assembling. New leafs and all new shackles, brakets and lines were done.

IMG_0297_zps5e466de1.jpg


IMG_0301_zps0931599f.jpg


IMG_0305_zps5f6a7c58.jpg


IMG_0306_zps84e0d8f4.jpg


IMG_0307_zps54fec1ac.jpg


IMG_0308_zpsd0433ceb.jpg


IMG_0310_zps11576281.jpg
 

powerstroker66

New member
Joined
Nov 12, 2012
Messages
236
Reaction score
0
Location
pipersville, PA
now that the rear end was basically done it was time to tackle the front and that meant the Rad support had to be reconstructed since ford no longer offers a powerstroke rad support...after sand blasting i found out the areas thats needed to be adressed. And the cutting began along with welding and forming all new pieces.

IMG_0311_zpsdf234919.jpg


IMG_0315_zpsee5607ca.jpg


IMG_0316_zpsab9ae4b7.jpg

IMG_0318_zps80f9e862.jpg


after 18 hours the rad support was done and ready for paint

IMG_0319_zps8ae49030.jpg


here is a pile of cut out rotted pieces
IMG_0320_zps95cd8952.jpg


here is the rad support all painted, came out sweet
IMG_0321_zps4c57787f.jpg


now came time to put it all back together

IMG_0331_zps8c8cf74b.jpg

IMG_0362_zps58bb089b.jpg


IMG_0363_zps77bea6c9.jpg

IMG_0400_zpsaba1f87c.jpg
 

powerstroker66

New member
Joined
Nov 12, 2012
Messages
236
Reaction score
0
Location
pipersville, PA
next came the over welming task of paint and body work..the whole truck was ripped down with 400 on a 5" DA that i did and i got the body work close. My dad's friend owns a boddy shop so he helped me with the fine tunning body work and paint.

IMG_0402_zps2992fdcd.jpg

here is the truck all sanded....next its time for sealer

IMG_0426_zpse572f28f.jpg


IMG_0427_zps15f5fe67.jpg


Time to go to the body shop for final paint!
IMG_0428_zpsd572fe6a.jpg


once at the body shop both doors and hood had to come off and james had to be painted.

IMG_0442_zps0a75efaf.jpg


IMG_0443_zpsce30cf05.jpg


IMG_0439_zps59e54ad8.jpg


IMG_0450_zps770921f1.jpg


Now it was time to paint the outside it was based with 5 coats of Dupont GM code 6004R and 3 coats of clear.
IMG_0455_zpse7b5487b.jpg

IMG_0456_zps2bf76e34.jpg


IMG_0458_zps7b7e6b41.jpg

IMG_0459_zps6f9e2f63.jpg


and the final product
IMG_0462_zpsadf55621.jpg


now its time for the bed...i did all the body work myself along with reconstructing the inner wheel wells out of fiber glass..oh yea i found a rust free bed of a 97' gas job for $350 with a straight tail gate!!

IMG_0444_zps1f4250b8.jpg


then it was loaded up and shipped to the body shop aswell.

IMG_0473_zpsbb31fbbf.jpg


luckaly i had my dads toolcat to help me fork the bed in and out of the paint booth.
IMG_0472_zps7c75bfad.jpg


i forgot to take pictures but here is the bed painted and on the truck
IMG_0475_zps02a84a6f.jpg


they needed the truck out of the shop so the bed buffing had to be done back home
IMG_0476_zps217a09a9.jpg


and here it is all buffed out
IMG_0481_zpsd42b0140.jpg


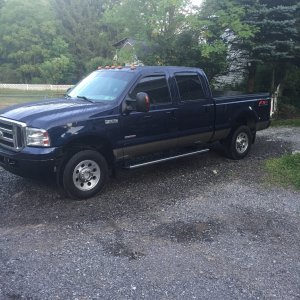
after finding a tire/wheel combo on craigslist i put them on the truck and drive it in the light to get a good pic of the blue with the wheels and it looks F*** sick!!!

IMG_0482_zps1e6365da.jpg


it needed a new exhaust so i went with a 5" system

IMG_0483_zps2e5d14eb.jpg


IMG_0484_zps95fde786.jpg


now i just had to put the front end completley back together

IMG_0486_zps8943714c.jpg


IMG_0487_zps662c3db9.jpg


FINALLY the truck was basically done minus the tail gate and visor
IMG_0490_zps9fe3ac37.jpg


IMG_0491_zps58c89b8e.jpg

IMG_0499_zpse938d892.jpg


IMG_0501_zps56f8737c.jpg


About a week later the tail gate was done
IMG_0514_zps0cd18b44.jpg


and finally the visor

IMG_0517_zps4a39b44e.jpg


finally after 4 months and $7,000 and 100s of hours of time the truck was done and i was able to drive it.
IMG_0532_zpsf4626a96.jpg


I hope this put it into perspective at what is involved in doing these trucks. In my case i went with the best you could buy and doing everything but the body work myself saved me alot of money. Feel free to ask any questions you may have.
 

akf250

New member
Joined
Sep 14, 2011
Messages
153
Reaction score
0
That's a sick truck! Mad props on the resto and good write up!
 

davey99ps

New member
Joined
May 22, 2011
Messages
1,266
Reaction score
0
Location
Waterford WI
I commented in the other thread, an I'll say it here, the truck looks amazing. I'm half-way down that path myself with mine, it's a lot more expensive an time consuming than most people realize. Yours turned out really good, an I hope mine turns out close to as nice as yours.

Can you pm me the info on the color and paint you used, an also what you used for exhaust? Thanks in advance
 
Last edited:

Latest posts

Members online

No members online now.
Top