Peroni
Member
First off I cannot take credit for coming up with this, that goes to these guys here.
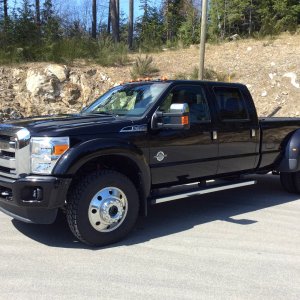
I'll skip over the whole drum vs disc argument and say I though this was a neat project and would be a lot of fun. Plus I just love modding my truck!
I went a slightly different way than using all van parts. The backing plate brackets are from a 2000 E350 but I found the rear wheel caliper bracket and calipers from the SD trucks bolt right up to the van brackets so I used them. I did this as if I ever needed replacement parts quick all the stores in my area stock the SD parts, the van stuff was all special order. I also used the truck backing plates but two right hand ones are required for the swap. And of course the van rotors are required.
I knew this was not going to be a weekend project or even a week long one. So I went to the local parts yard and picked up a spare axle to run while I modded my original which I knew was in excellent condition.
Taking the axle shafts off and removing the hubs and backing plates was very easy. Getting the old backing plate flange off was a bit more difficult. I ended up using a cut off wheel to get through most of the weld, working at the flange in quarters made this easier. The remaining material needs to be carefully ground down to match the axle diameter.

I drew up new flanges in MasterCam and cut them out on the VMC at work from 3/4" 1018 plate. To keep the flange perpendicular to the spindle and spaced correctly I made a simple alignment jig. It bolts to the hub which is then installed back onto the spindle and the nut tightened, this also allows for the flanges to be rotated to their correct position. I did not use the axle tube for a reference surface as I was not convinced it was in the same plane as the spindle. By using the spindle I was assured the calipers would line up square to the rotor.


I had the flanges welded on by a professional welder. I can get by with my welding skills in most cases but don't do it every day and did not want to take any chances with this very important part of the project. Once everything was welded up I cleaned and painted the axle, mounted the backing plate to its bracket and bolted it to the axle. I used self locking nuts on the original bracket studs. Also note I ground out the 4 casting pockets on the spring perches and filled them with epoxy. All they do is collect salt and add to the rusting process.

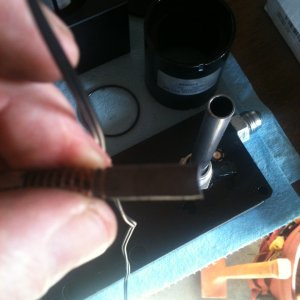
Since the Sterling 10.25 hub is larger in diameter than the 10.5 hub the parking brake shoes need to be modified. Again I made a simple jig to hold the shoes for machining. A pair of dowel pins cradles the friction surface while a third clocks it to position and the shoe is secured with 3 screws. I used a 1/4 end mill and taking 3 cuts to keep cutting forces low, milled away the excess material.


I drilled new holes for the upper return spring, the spring itself came from Mcmaster Carr. Its ends were bent to resemble the green lower return spring. I also had previously milled the backing plate to create some clearance for the spring so nothing would rub.

All the hard stuff is done now. The hubs were reassembled and the rotors installed. I went with slotted and cryoed rotors as I had very good luck with them on my front brakes. The caliper and bracket bolted right up and I used Hawk LTS pads.

Now it's time to put the axle back under the truck, hook up brake lines, fill with oil and install the vent line. I chose to make a new vent line fitting from stainless steel, copying the original as it had rusted and made removing the brake hose very difficult. I went with new braided stainless flex lines. Because of the hex end fittings I needed to raise the flex line off the axle tube. I made a stainless washer 1/8 thick and cut one surface with a 1.750 radius so it fit the axle tube perfectly. Also because of the way the lines were made I had to machine a special adapter for the driver's side. It's a female inverted flare to female inverted flare coupler.

For the passenger side I made up a little tab and welded it to the axle tube. Again it was machined with a 1.750 radius to match the tube and help provide a solid mount. The flex line is secured with a standard brake hose clip. The hard line is stainless steel, I purchased and installed the complete brake line kit from Inline Tube. I simply cut the pass side hard line to length, installed a 3/8-24 tube nut and double flared the end. You need to discard the supplied tube nut on the pass side as it is 7/16 to match the old drum wheel cylinder.

I did not have a chance yet to install the parking brake cables. I got the SD truck cables and will see how well they work out. Another note on the flex lines, I had to mill the caliper end quite a bit to be able to mount them coming out parallel to the axle. Looking back I would have gotten the flex lines with just a simple swivel on each end and used standard banjo fittings. I could have also dispensed with the special adapter fitting.

Once the wheels were back on I refilled the master and bled all the calipers. I used a MityVac hand held bleeder and it made the job very easy and fast. Pads were broken in per instructions and the truck stops far better than ever before. Pedal feel is excellent although pedal travel is slightly more, maybe 1/3 travel vs 1/4 for the old setup. I'm still waiting for parts to convert to hydroboost so maybe with the slightly larger master this will help.
I sourced all my hardware from the local Cat dealership, all of it was metric except for the axle shaft bolts. Pads and rotors were sourced from AJ USA, flex lines were from Crown Performance. Calipers, caliper brackets, parking brake shoes, and cables plus hub seals all came from Napa. Van brackets came from my local junk yard. I had to special order two right hand backing plates/rotor shields from the parts store. Total cost was about $650 with most of that tied up in the rotors.
As you can see this is an involved project and it's a lot of work but I had a good time with it. At the time of this posting I have 300 miles on the conversion with over half of those towing 12000lbs and zero problems.
I'll skip over the whole drum vs disc argument and say I though this was a neat project and would be a lot of fun. Plus I just love modding my truck!
I went a slightly different way than using all van parts. The backing plate brackets are from a 2000 E350 but I found the rear wheel caliper bracket and calipers from the SD trucks bolt right up to the van brackets so I used them. I did this as if I ever needed replacement parts quick all the stores in my area stock the SD parts, the van stuff was all special order. I also used the truck backing plates but two right hand ones are required for the swap. And of course the van rotors are required.
I knew this was not going to be a weekend project or even a week long one. So I went to the local parts yard and picked up a spare axle to run while I modded my original which I knew was in excellent condition.
Taking the axle shafts off and removing the hubs and backing plates was very easy. Getting the old backing plate flange off was a bit more difficult. I ended up using a cut off wheel to get through most of the weld, working at the flange in quarters made this easier. The remaining material needs to be carefully ground down to match the axle diameter.
I drew up new flanges in MasterCam and cut them out on the VMC at work from 3/4" 1018 plate. To keep the flange perpendicular to the spindle and spaced correctly I made a simple alignment jig. It bolts to the hub which is then installed back onto the spindle and the nut tightened, this also allows for the flanges to be rotated to their correct position. I did not use the axle tube for a reference surface as I was not convinced it was in the same plane as the spindle. By using the spindle I was assured the calipers would line up square to the rotor.
I had the flanges welded on by a professional welder. I can get by with my welding skills in most cases but don't do it every day and did not want to take any chances with this very important part of the project. Once everything was welded up I cleaned and painted the axle, mounted the backing plate to its bracket and bolted it to the axle. I used self locking nuts on the original bracket studs. Also note I ground out the 4 casting pockets on the spring perches and filled them with epoxy. All they do is collect salt and add to the rusting process.
Since the Sterling 10.25 hub is larger in diameter than the 10.5 hub the parking brake shoes need to be modified. Again I made a simple jig to hold the shoes for machining. A pair of dowel pins cradles the friction surface while a third clocks it to position and the shoe is secured with 3 screws. I used a 1/4 end mill and taking 3 cuts to keep cutting forces low, milled away the excess material.
I drilled new holes for the upper return spring, the spring itself came from Mcmaster Carr. Its ends were bent to resemble the green lower return spring. I also had previously milled the backing plate to create some clearance for the spring so nothing would rub.
All the hard stuff is done now. The hubs were reassembled and the rotors installed. I went with slotted and cryoed rotors as I had very good luck with them on my front brakes. The caliper and bracket bolted right up and I used Hawk LTS pads.
Now it's time to put the axle back under the truck, hook up brake lines, fill with oil and install the vent line. I chose to make a new vent line fitting from stainless steel, copying the original as it had rusted and made removing the brake hose very difficult. I went with new braided stainless flex lines. Because of the hex end fittings I needed to raise the flex line off the axle tube. I made a stainless washer 1/8 thick and cut one surface with a 1.750 radius so it fit the axle tube perfectly. Also because of the way the lines were made I had to machine a special adapter for the driver's side. It's a female inverted flare to female inverted flare coupler.
For the passenger side I made up a little tab and welded it to the axle tube. Again it was machined with a 1.750 radius to match the tube and help provide a solid mount. The flex line is secured with a standard brake hose clip. The hard line is stainless steel, I purchased and installed the complete brake line kit from Inline Tube. I simply cut the pass side hard line to length, installed a 3/8-24 tube nut and double flared the end. You need to discard the supplied tube nut on the pass side as it is 7/16 to match the old drum wheel cylinder.
I did not have a chance yet to install the parking brake cables. I got the SD truck cables and will see how well they work out. Another note on the flex lines, I had to mill the caliper end quite a bit to be able to mount them coming out parallel to the axle. Looking back I would have gotten the flex lines with just a simple swivel on each end and used standard banjo fittings. I could have also dispensed with the special adapter fitting.
Once the wheels were back on I refilled the master and bled all the calipers. I used a MityVac hand held bleeder and it made the job very easy and fast. Pads were broken in per instructions and the truck stops far better than ever before. Pedal feel is excellent although pedal travel is slightly more, maybe 1/3 travel vs 1/4 for the old setup. I'm still waiting for parts to convert to hydroboost so maybe with the slightly larger master this will help.
I sourced all my hardware from the local Cat dealership, all of it was metric except for the axle shaft bolts. Pads and rotors were sourced from AJ USA, flex lines were from Crown Performance. Calipers, caliper brackets, parking brake shoes, and cables plus hub seals all came from Napa. Van brackets came from my local junk yard. I had to special order two right hand backing plates/rotor shields from the parts store. Total cost was about $650 with most of that tied up in the rotors.
As you can see this is an involved project and it's a lot of work but I had a good time with it. At the time of this posting I have 300 miles on the conversion with over half of those towing 12000lbs and zero problems.