Goin' Low - Thanks to DJM!

Power Hungry

Member
Joined
Jun 20, 2011
Messages
365
Reaction score
0
Location
Winder, GA
A few months ago I ordered my DJM Suspension 3/5 lowring kit. This included the 3" Dream Beams front drop and the 5" rear perches and shackles. Of course, we've been so swamped at the office that there simply wasn't enough time to get the kit installed in the truck. Well, since we were closed for the holidays last week, I finally bit the bullet and made the decision to get the kit installed. With a LOT of help from Jay Chatham (PHP's newest employee, by the way), we get the front end completed last Saturday and the front end completed this Saturday.

I still need to get the front end aligned and I am playing with with different spring/mounting combinations on the rear to achieve the stance and ride I'm looking for, but overall it was a relatively good install. Since we don't have a lift, we have to do everything on the ground. However, this makes it interesting since it really shows just how easy this kit is to install. Anyway, here's some pictures of the install. I'll break them up into front and rear, just so it's easier to understand.

Enjoy!
 

Power Hungry

Member
Joined
Jun 20, 2011
Messages
365
Reaction score
0
Location
Winder, GA
Front Drop Install

FRONT DROP INSTALLATION:

To start with, make sure you have a solid work area and GOOD QUALITY jack stands. We don't want to lose our head on this project!

Once the front was jacked up and the wheels removed, the first thing we need to do is remove the brake caliper, the brake rotor, the ABS sensor, and the spindle.

(Click image to enlarge)
front_brakes_sm.jpg


Next, you'll remove the spindle assembly by removing the upper ball joint clamp/alignment adjuster and loosening the lower ball joint nut. DO NOT REMOVE the nut completely until you've separated the lower ball joint. If you do not have a ball joint separator, you can rent one from many auto parts stores. It is also highly advisable that you replace the ball joints while you're there. It will be money well spent. If you don't have a ball joint press, many auto part stores can either rent you one or can replace the ball joints for you.

(Click image to enlarge)
front_spindle_sm.jpg


(Click image to enlarge)
ball_joints_sm.jpg


With the spindle out of the way, you can now remove the front spring. First, disconnect the sway bar link. Once disconnected, jack up the I-beam slightly and then remove the shock absorber. When you let the jack down, this will relieve all the tension on the front spring. With the tension off, remove the upper spring clamp, unseat the spring from the upper perch, and then remove the lower spring clamp. Remove the front spring and set aside. With the spring removed, you can now remove the long bolt connecting the I-beam to the radius arm.

(Click image to enlarge)
i_beam_bolt_sm.jpg


Remove the bolt holding the I-beam pivot to the frame bracket and then remove the I-beam. The driver's side is pretty easy. When doing the passenger's side, you will not be able to completely remove the bolt from the bracket as it will hit the oil pan. You'll have to completely remove the bracket assembly by removing the 3 bolts that hold the bracket to the frame. This isn't very difficult to do, just a little inconvenient.

(Click image to enlarge)
i_beam_pivot_sm.jpg


You can clearly see the difference in the positioning of the spindle with the Dream Beams. That's a solid 3" drop.

(Click image to enlarge)
i_beam_stock_vs_db_sm.jpg


As usual, reassembly is the reverse of the disassembly. A few more tips: 1) Install an adjustable alignment clamp for the upper ball joint. This will save time when you go to get the front end aligned. 2) Make sure the radius arm bolt is TIGHT or you will experience popping from the front end when braking. This is particularly noticeable when backing up and then going forward.

Once the installation was completed, here's what we ended up with.

(Click image to enlarge)
front_before_after_sm.jpg


Before the installation, we had a ride height of 5.75" from the top of the tire to the fender. When completed, the ride height dropped to 3.0", and that doesn't include any settling that will occur of the next couple days.

Coming up next, the rear suspension kit!
 

Redneck6.0L

New member
Joined
May 19, 2011
Messages
1,123
Reaction score
0
Forget the dropping low. What happened to the big hp build, riley pump monster you were building. Haven't seen any results yet. Couldn't make hp now your making it look pretty LOL
 

Power Hungry

Member
Joined
Jun 20, 2011
Messages
365
Reaction score
0
Location
Winder, GA
Forget the dropping low. What happened to the big hp build, riley pump monster you were building. Haven't seen any results yet. Couldn't make hp now your making it look pretty LOL

First: There's a functional reason for the drop kit. We have a 118 Mile Road Race in April and will be running in the 115 MPH class (140 MPH Max Tech Speed). I need to have the suspension set up to handle high speed driving and turns and not shake itself apart going over bumps.

Second: I work within my budget. I got a good deal on the lowering kit, so in it went.

Third: I DID post results from the HPODS installation. If you missed them, it's not my fault. It's not my job to keep track of who reads what.

Fourth: I don't tell you how to masturbate. Don't tell me how to modify my truck. When I'm ready to step up on injectors and/or turbo, I will and I will post about it. Right now I'm very happy with the 540 HP I'm making with 175cc injectors and a Stock turbo.

Fifth: Have a safe and happy New Year! :pimp:
 

Buffalo444

New member
Joined
Jun 15, 2011
Messages
981
Reaction score
0
Location
Laramie, WY
First: There's a functional reason for the drop kit. We have a 118 Mile Road Race in April and will be running in the 115 MPH class (140 MPH Max Tech Speed). I need to have the suspension set up to handle high speed driving and turns and not shake itself apart going over bumps.

Second: I work within my budget. I got a good deal on the lowering kit, so in it went.

Third: I DID post results from the HPODS installation. If you missed them, it's not my fault. It's not my job to keep track of who reads what.

Fourth: I don't tell you how to masturbate. Don't tell me how to modify my truck. When I'm ready to step up on injectors and/or turbo, I will and I will post about it. Right now I'm very happy with the 540 HP I'm making with 175cc injectors and a Stock turbo.

Fifth: Have a safe and happy New Year! :pimp:

:eek:wned:


Best post evar. Lmao

Btw, that 540 is juiced, aint it?

sent from the rust monster
 
Last edited:

Lowdown89

New member
Joined
May 18, 2011
Messages
2,245
Reaction score
0
Location
Travelers Rest , SC
I should have just brought my lowering kit and let you put it on as well , would have saved me a few busted shins from tripping over the pile of stuff lol
 

Power Hungry

Member
Joined
Jun 20, 2011
Messages
365
Reaction score
0
Location
Winder, GA
:eek:wned:


Best post evar. Lmao

Btw, that 540 is juiced, aint it?

sent from the rust monster

Yes, the 540 HP was pulled running washer fluid in my Water/Meth tank. I'm out of Boost Juice right now but could probably tap 550 with it. Right now I am at 522 HP on #2 only. :naughty:
 

Power Hungry

Member
Joined
Jun 20, 2011
Messages
365
Reaction score
0
Location
Winder, GA
I should have just brought my lowering kit and let you put it on as well , would have saved me a few busted shins from tripping over the pile of stuff lol

Don't feel bad. I got cracked in the shins once, too. That'll teach me to try to walk and chew gum at the same time.
 

Power Hungry

Member
Joined
Jun 20, 2011
Messages
365
Reaction score
0
Location
Winder, GA
Rear Drop Install

REAR DROP INSTALLATION:

I will tell you right now, the EASIEST way to accomplish this installation is to remove the bed. The kit can certainly be installed with doing so, but it's like removing the cab to do head studs on a 6.0L... It just makes everything accessible. We had started off wanting to do this with the bed in place, but once we started to remove the front spring perches we decided to yank the bed. 4 bolts (in the bed), 3 screws (fuel filler), and 1 plug (tail lights) are all that it takes to remove the bed. That, and a couple guys to lift the bed off the frame. Jay and managed it alone, but I'm sure my back is not going to be happy about it. :D Anyway, let's move on to the details.

(Click image to enlarge)
bed_off_sm.jpg


Again, lift the vehicle off the ground and support with a good set of jack stands. Some advice here... Lift the vehicle, remove the tires, and then LOWER the vehicle at least 5" onto the jack stands. We made the mistake of leaving the jack stands at the height for the normal suspension (basically put the jack stands in before removing the tires) and it made it extremely difficult to get the axle lined back up with the springs. Also, when putting the vehicle back on the ground, we had to install a block of wood on top of the jack to lift the vehicle off the stands, so when we dropped it back on the ground we couldn't get the jack out from under the axle. Not a huge deal as we had a second jack, but just a waste of a few minutes.

So, with everything lifted and in place, we started by unbolting the axle U-bolts and removing the spring packs. You want to make sure that you keep the pinion supported. It helps with the alignment when reattaching the axle to the springs.

(Click image to enlarge)
front_spring_perch_sm.jpg


(Click image to enlarge)
rear_spring_perch_sm.jpg


(Click image to enlarge)
u_bolts_sm.jpg


With the springs out of the way, next comes the arduous process of removing the front spring perches. Since these are riveted in at the factory, there are basically only 2 ways to remove them. You can either take a cutting torch and cut the heads off of the rivets or you can use a grinder to grind the heads flush with the perches.

(Click image to enlarge)
removing_rivets_sm.jpg


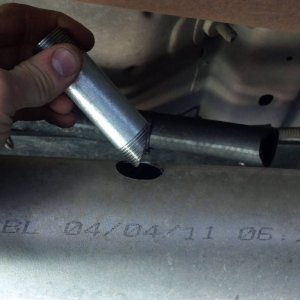
Once the rivet heads are removed, you'll need to use a punch or air hammer to drive the rivets out of the frame. You'll want to be VERY CAREFUL on the driver's side as the rivets are located next to the fuel tank. There is plenty of room for the rivets to come out, you just don't want to drive your punch into the tank.

(Click image to enlarge)
air_hammer_sm.jpg


The rest is pretty simple. The new spring perches bolt directly in place of the old ones and has three mounting holes for the spring. There is also included a new rear shackle which helps allow for suspension adjustment and to help retain proper pinion angle adjustments.

(Click image to enlarge)
rear_kit_sm.jpg


(Click image to enlarge)
finished_sm.jpg


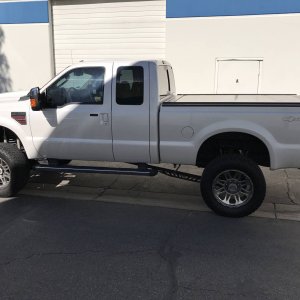
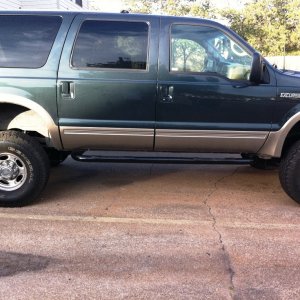
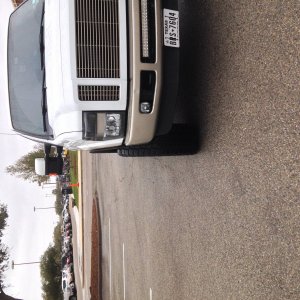
As you can see, the truck is leveled out quite nicely.

(Click image to enlarge)
sitting_level_sm.jpg


Now, one of the things we did while the springs were out was to remove some of the leaves in the spring in order to achieve a smother ride. I don't tow anything with my 6.0L so I'm not worried about load capacity. First, we removed the thick bottom leaf (#5) which added about 3/4" drop by itself. Then we removed the next two leaves (#3 and #4) leaving only the top two leaves. This provided a really nice ride and stance, but unfortunately introduced a ridiculous amount of axle wrap and wheel hop. Of course, it didn't help that the bed was not on the truck. Deciding we needed the spring to be a bit stiffer, we went back and re-installed leaf #4 which helped considerably with the axle wrap. We've got a set of traction bars on order and that will help eliminate any remaining axle wrap and keep the axle properly located. We're also looking to install an anti-sway bar kit for the rear to help prevent body roll with the softer springs. We're still playing with some different combinations of front and rear perch height adjustments, but those are mostly just to achieve an appropriate pinion angle.

Once we get the bed back on the truck, we'll get the pictures posted up. The kit was relatively easy to install and while air tools make everything go faster, it can certainly be installed with hand tools (and a grinder). Again, many thanks to the guys at DJM Suspension (particularly Mark) for their guidance and assistance, not to mention putting together such a solid kit!

Take care and HAPPY NEW YEAR! :D
 

Power Hungry

Member
Joined
Jun 20, 2011
Messages
365
Reaction score
0
Location
Winder, GA
Thanks. It has definitely been a fun project. I can't wait to get the new wheels on the truck. These are going on it next week...

novakane-8-stealth_21_1.jpeg


20x10 with 295/45-20 Goodrich g-Force tires. V-rated for 149 MPH. :D
 

2wd-fire

New member
Joined
Mar 26, 2012
Messages
394
Reaction score
0
Love it. It's gonna look badass when done. You think your gonna short bed it eventully?
 

Dave

New member
Joined
May 18, 2011
Messages
1,555
Reaction score
0
Damn Bill thats gonna be fun.

What size nozzles on the 175s? How hot does it run?
 

Power Hungry

Member
Joined
Jun 20, 2011
Messages
365
Reaction score
0
Location
Winder, GA
Love it. It's gonna look badass when done. You think your gonna short bed it eventully?

I'm still struggling with the decision to shorten it. Straight short beds are difficult to find. Plus a longer wheelbase will track and handle better at higher speeds. Given that I plan to run the truck in a high speed road race this spring, I'm not sure I want to shorten it. The weight savings is negligible (maybe 300 Lbs) so the only reason to do it would be aesthetics. Now if I was drag racing the truck full time, the shift in weight transfer would make shortening worthwhile. At that point, though, it might just be better to sub-frame the rear and tub the bed.

Decisions... Decisions...

Damn Bill thats gonna be fun.

What size nozzles on the 175s? How hot does it run?

Stock nozzles. On fuel only it will hit 1500º-1600º at the end of the 1/4 mile. With Water/Meth, it holds at 1400º. On the street, I rarely see over 1100. The Water/Meth first stage comes on at ~16 PSI and the power stage comes on at 27 PSI. It really keeps things cool.
 

FallenAuthority

New member
Joined
Jul 5, 2012
Messages
168
Reaction score
0
Location
La Plata, MD
Lookin great, cant wait to see pics of it with the new wheels on it.
Oh and FYI, you can use a pointed flat chisel on an air hammer to break the heads of the rivets off for the perches. It is fast and clean, then use the pointed round chisel to punch the rest out of the frame like you did. Just a little tip to make it a little easier and faster for you should you install another kit like that :)
 
Top