brewer
Member
- Joined
- May 18, 2011
- Messages
- 191
- Reaction score
- 0
Well, I know there's a lot of D60 swap threads out there already, but thought I'd throw in some more pics and info that might be useful.
What I started with, '97 D60:
I was lucky to find exactly what I was looking for, a direct-swap ball-jointed D60. Unfortunately being in school it took me 6 months to do the full swap including a partial rebuild of the axle. So, did the rebuild first, then swapped it in about a month ago.
The axle:

Started pulling it apart with the help of Nick, weekendwarriorfsw32, and a couple other friends.

The biggest issue I had here was getting the spindles off, as they were stuck onto the dust shield. So, using A LOT of PB Blaster, a torch, and a couple different chisels and BFH's. There's a flat spot on the knuckle that gives you a small space to hit the spindle, and IMO it should've been made larger. If possible to find a slide hammer I would support using that, but not an air chisel. I tried an air chisel, but I was making too big of dents in the spindle with it. Even though I'm in California with no salt, this thing was sitting outside for awhile before I got it so I'm sure that didn't help the situation.
In the end, thanks to a suggestion from Cat, I thickly coated both the inner side of the spindle and the outer surface of the knuckle with anti-seize, and left the dust shields off.
Here's how the spindle looked, and the dust shields
 :
:


Then started cleaning it up, stripped down to bare metal with a grinding wheel, wire brush, and a tooth brush. Found this in the axle tubes, a greasy, sandy mess:

And here's how the axle shafts looked:

So, with that shown, I can tell my inner seals were working...mostly. Now, if I wasn't doing this on somewhat of a budget and had more time, I would've done the inner and outer seals that Tom S did on his. I'm planning on doing these and ball joints in the next year as I'm sure I'll still have some leaks in the inner seals.
Made my own spray booth in the garage:

I just used Rust-Oleum rattle can. Like I said, it was sort of on a budget and on a time constraint, so I used that. If I was to do it over again, I might have used Eastwood chassis paint or something similar. But, it's still holding up well so far, I'll update later on.
Tried chiseling at the spindle bearings to remove and replace them, but before I put any more marks in them I decided to take them to a shop to do this. I couldn't find a place that would do it but it ended up that a guy I know at the local stealership did it for free
 . Ended up cleaning up the spindles to make them pretty much dent-free.
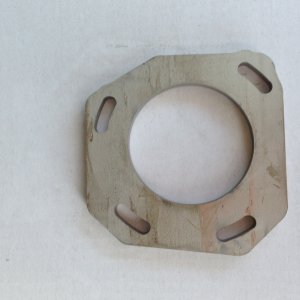
When I got the axle apart, I found out it used to have auto hubs, so it had the 6-sided nuts inside with the little keeper holding it in. Here's what the spindle socket for that looks like:

I already had manual hubs on my truck, and since it's said not to be a good idea to run the auto hub nuts on manual hubs (not to mention I destroyed one keeper getting it out
 ), I was going to use the manual hub nuts from my D50. Since I couldn't find a good picture online of the spindle socket for the manual hubs, here's one:


The auto socket is $10 and the manual one is $20, both at O'Reilly's.
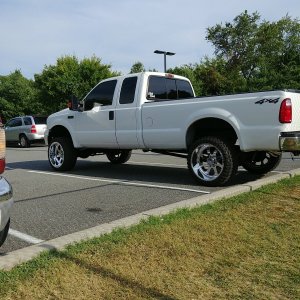
Got it all put back together, and time for the swap. Here's the ride height of the D50, complete with about 1.5" of suspension travel
:

Pulling it all apart, again thanks to Nick, weekendwarriorfsw32, and a couple other friends for help. I highly recommend a couple friends for help, not only for time-wise but also like said in other threads the D50 just falls apart in a big pile of mess when you start unbolting it.


Had to get a pic of the axle out of it
:

Since it's a '97 axle, I tied my brakes back onto the body and bolted them back up. So then the axle just slides back in and bolts right up

Don't forget to paint the outer surface of the hub (the part of the brake disc assembly), it was something I kept meaning to do for the past couple years and never got around to it. Looks 2x better
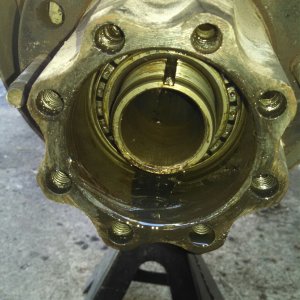
Surgery, aka packing the hubs with some grease, and reassembly (remember how they go back together, but they're pretty simple, really).

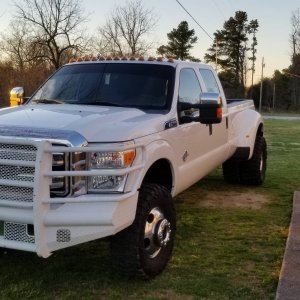
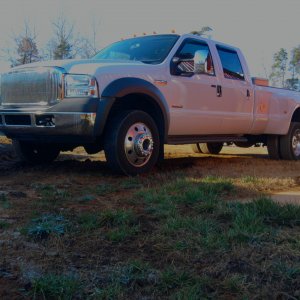
All done


What I started with, '97 D60:
I was lucky to find exactly what I was looking for, a direct-swap ball-jointed D60. Unfortunately being in school it took me 6 months to do the full swap including a partial rebuild of the axle. So, did the rebuild first, then swapped it in about a month ago.
The axle:
Started pulling it apart with the help of Nick, weekendwarriorfsw32, and a couple other friends.
The biggest issue I had here was getting the spindles off, as they were stuck onto the dust shield. So, using A LOT of PB Blaster, a torch, and a couple different chisels and BFH's. There's a flat spot on the knuckle that gives you a small space to hit the spindle, and IMO it should've been made larger. If possible to find a slide hammer I would support using that, but not an air chisel. I tried an air chisel, but I was making too big of dents in the spindle with it. Even though I'm in California with no salt, this thing was sitting outside for awhile before I got it so I'm sure that didn't help the situation.
In the end, thanks to a suggestion from Cat, I thickly coated both the inner side of the spindle and the outer surface of the knuckle with anti-seize, and left the dust shields off.
Here's how the spindle looked, and the dust shields
Then started cleaning it up, stripped down to bare metal with a grinding wheel, wire brush, and a tooth brush. Found this in the axle tubes, a greasy, sandy mess:
And here's how the axle shafts looked:
So, with that shown, I can tell my inner seals were working...mostly. Now, if I wasn't doing this on somewhat of a budget and had more time, I would've done the inner and outer seals that Tom S did on his. I'm planning on doing these and ball joints in the next year as I'm sure I'll still have some leaks in the inner seals.
Made my own spray booth in the garage:
I just used Rust-Oleum rattle can. Like I said, it was sort of on a budget and on a time constraint, so I used that. If I was to do it over again, I might have used Eastwood chassis paint or something similar. But, it's still holding up well so far, I'll update later on.
Tried chiseling at the spindle bearings to remove and replace them, but before I put any more marks in them I decided to take them to a shop to do this. I couldn't find a place that would do it but it ended up that a guy I know at the local stealership did it for free
When I got the axle apart, I found out it used to have auto hubs, so it had the 6-sided nuts inside with the little keeper holding it in. Here's what the spindle socket for that looks like:
I already had manual hubs on my truck, and since it's said not to be a good idea to run the auto hub nuts on manual hubs (not to mention I destroyed one keeper getting it out
The auto socket is $10 and the manual one is $20, both at O'Reilly's.
Got it all put back together, and time for the swap. Here's the ride height of the D50, complete with about 1.5" of suspension travel
Pulling it all apart, again thanks to Nick, weekendwarriorfsw32, and a couple other friends for help. I highly recommend a couple friends for help, not only for time-wise but also like said in other threads the D50 just falls apart in a big pile of mess when you start unbolting it.
Had to get a pic of the axle out of it
Since it's a '97 axle, I tied my brakes back onto the body and bolted them back up. So then the axle just slides back in and bolts right up
Don't forget to paint the outer surface of the hub (the part of the brake disc assembly), it was something I kept meaning to do for the past couple years and never got around to it. Looks 2x better
Surgery, aka packing the hubs with some grease, and reassembly (remember how they go back together, but they're pretty simple, really).
All done

 .
.