Forums
New posts
Search forums
What's new
New posts
New media
New media comments
New profile posts
Latest activity
New showcase items
New showcase comments
Media
New media
New comments
Search media
Members
Current visitors
New profile posts
Search profile posts
Showcase
New items
New comments
Latest content
Latest reviews
Latest updates
Search showcase
Log in
Register
What's new
Search
Search
Search titles only
By:
New posts
Search forums
Menu
Log in
Register
Install the app
Install
Forums
Power Strokes
6.4 Aftermarket
Travish3's Projector retro fit guide(PIC HEAVY)
JavaScript is disabled. For a better experience, please enable JavaScript in your browser before proceeding.
You are using an out of date browser. It may not display this or other websites correctly.
You should upgrade or use an
alternative browser
.
Reply to thread
Message
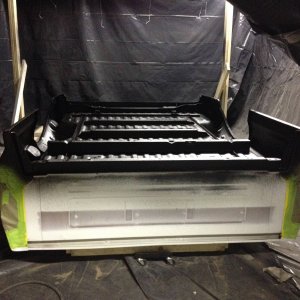
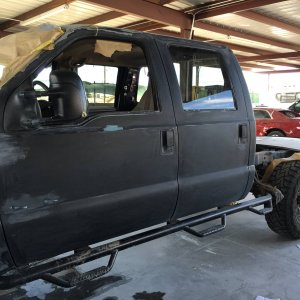
[QUOTE="travisH3, post: 1023224, member: 10299"] ok heres my projector retro fit. All parts were purchased through the retrofit source. Ill post links so you can see what you need for the job. [B]projector retro fit kit[/B]- I used the morimoto mini d2s x lens(square lens) 35 watt ballast with 5000k color temperature bulb, h13 wiring harness with sqaure gatlin gun shrouds. [url=http://www.theretrofitsource.com/complete-retrofit-kits/bi-xenon-mini-stage-3-kit-d2s.html#.U6tXSfldV5E]Bi-xenon Morimoto Mini Stage III Kit (D2S)[/url] [B]3" xb led amber strip[/B] [url=http://www.theretrofitsource.com/led-lighting/morimoto-xbled-strips.html#.U6tX2_ldV5E]Morimoto XB LED Strips - Accessories from The Retrofit Source Inc[/url] [B]80mm housing caps[/B]- these are needed for the back of the lights to seal them up because the bulb will protrude out the back of the light so these allow you to seal up the light and give some extra room for the bulb/plug [url=http://www.theretrofitsource.com/accessories/rubber-housing-caps.html#.U6tYn_ldV5E]Rubber Housing Caps - Accessories[/url] ok lets get started, first you need to bake the headlights apart, remove all bulbs, rubber seal around headlight bulb socket, and 3 screws are recessed into the back of the head light. 2 hold the top reflector, the other one bolts to the lens assembly so its best just to remove them all now. Ive baked a few headlights and these were by far the toughest to get apart. the factory butyl doesnt really get soft and sticky, its just barely softens up. normally i do 265 degrees for 7-8 minutes and if needed i will do a second cook same amount of time because the butyl starts to cool down and harden, the second cook it usually comes right apart easy.....not ford oem lights lol. it took 2 15 minute cooks for one light and 3 15 min cooks at 265 for the other. and you really have to work them hard to get apart. be careful, everything is warm and dont pry too hard in one spot, keep working a corner until you start getting it free then you can work it all the way around so, pre heat to 265, turn oven off and bake for 15 minutes twice and see how they are, you may need to do it a third time like i did. you wont hurt the lights at all. when your done you should have something like this [ATTACH=full]138031[/ATTACH] there will be 3 screw holding the reflector to the lens, and then another 3 screws holding the chrome surround to the lens. next i started sanding the surround to prep them for paint. [B][U][I]DO NOT USE BRAKE CLEANER ON PLASTIC to get them clean for paint![/I][/U][/B] , [U]the plastic crumbles[/U]. luckily i bought a set of headlights off ebay to use the clear reflectors and the surrounds were the same so i was able to use the chrome surround from the ebay lights on my oem lights. (i planned to use the ebay lights but found out after taking them apart the adjuster screw was stripped out and i didnt want to risk all the hard work on cheap headlights. [ATTACH=full]138032[/ATTACH] after getting that mess sorted out i used rustoleum plastic primer and semi gloss black to paint the surround. primed [ATTACH=full]138033[/ATTACH] semi gloss black [ATTACH=full]138034[/ATTACH] next start working on the headlight sockets, ****WARNING: test high beams with 9v battery. they say to test the high beams operation with a 9v battery 40 times clicking it on and off. if the mechanism is faulty it will fail in the first uses so by engaging it 40 times you wont get it all together and realize high beams dont work on the projectors. you will hear a click and you will see the actual cut off shield moving in the projector. the d2s projectors are slightly bigger than the bulb opening so you have to use a dremel to open them up, if you use the mini h1 projectors you can skip this step but you will still need to sand the back of the reflector housing down to allow enough threads for the shaft of the projector to fit through the light. this will make more sense once you have the projectors in front of you. my dremel job wasnt perfect but it works lol. i did all trimming without removing reflector bowl, i just found it was easier that way, just make sure you blow out all the shavings good. you will need to remove the bulb cap in the reflector housing and i also sanded off the little block where the bulb cab bolted to the reflector(you can see the black square is where i sanded it off. this will be hidden behind the projector, there will be a hole in the square as well so i ran my high beam wires through there. you will also need to drill a hole for the high beam wires to pass through the housing either through the housing it self or putting it through the dust cap at the end. i chose through the housing and will silicone the hole after cooking. [ATTACH=full]138035[/ATTACH] [ATTACH=full]138036[/ATTACH] test fit projectors and shroud to see what it would look like cuz i got excited lol. [ATTACH=full]138037[/ATTACH] Now the not so fun part. installed the projectors in the light housing and took them out to truck. went ahead and ran my relay harness and ballasts. connected the headlight bulbs and popped the headlights into place. with the head light reflectors adjusted to the center of the adjustment range i wanted the headlights to be close to where they needed to be. this way the lights willl have full up and down adjustability. youd hate to do all this work to install them and realize you have them pointed too far down and they wont adjust enough to get them where you need it. for my lights i had to sand the back of the reflector housing at the bottom to get the projector to point up more. in the end i still wasnt happy so i used and extra piece of projector rubber bushing and put it at the bottom of the projector so when you bolt it up, the projector points up. its hard to explain but heres pictures of what i did. as you can see i pulled the bushing off and glued another piece of rubber to the projector so when you put the bushing back on and bolted it up it points up. [ATTACH=full]138038[/ATTACH] after doing that i was happy with the range of the adjustment. here is a picture of the projector tighted down, and bulb installed into projector [ATTACH=full]138039[/ATTACH] here is a picture of low beams [ATTACH=full]138040[/ATTACH] high beams [ATTACH=full]138041[/ATTACH] here is the low beam cut off line along the garage, no hid glare like when you just install bulbs in oem housings! [ATTACH=full]138042[/ATTACH] now that projectors are installed and aimed, i installed the painted surround into the headlight lens. be sure to wipe the lens clean before doing this because once the surround is in it will be hard to clean it well. then i installed the reflector. you should have something like this. [ATTACH=full]138043[/ATTACH] next steps may not pertain to you unless you want to add custom led strips. i bought a 3" amber led strip to use as a running light. what i did was used tape to move the light around and get it where i want it. here is a pic of it lit up when i first opened the lights to see how it would look. its really bright, pics dont do it justice. these were just tested using a 9v battery again. [ATTACH=full]138044[/ATTACH] [ATTACH=full]138045[/ATTACH] once i got the led where i wanted i pulled the film off the double sided tape and stuck it down. afraid the tape may not last i decided to epoxy the led down to make sure it doesnt move. i also epoxied the wires down in one spot to be sure i dont accidentally pull the wires on the led. just to be safe. drilled a hole for wires to pass through, i will silicone the hole up after baking the lights back together. [ATTACH=full]138046[/ATTACH] finally lets put these back together! Butyl that came with the kit, i bought an extra roll to be safe but the roll that came with the kit was PLENTY, like there was enough to do a whole other set plus my extra roll i bought lol. I used a heat gun and cleaned the channel out removing all the old junk butyl that ford used since it isnt very soft. just be careful not to melt the plastic..... :doh: [ATTACH=full]138047[/ATTACH] the butyl will be too big to fit in the channel so if you pull it, it will thin up and just put enough in to barely fill the channel. when you make it all the way back around make sure you over lap the butyl so it doesnt have a gap where the two meet. go ahead and screw the top turn signal reflector screws back in from the back side of the housing now. make sure they are tight because the rubber washer seals moisture out. [ATTACH=full]138048[/ATTACH] [ATTACH=full]138049[/ATTACH] [ATTACH=full]138050[/ATTACH] next its baking time once again. what i did was put the lens on the lights once you get the butyl laid in the channel and put everything in the oven. this way everything is warm when going back together and you get a good seal. preheat the oven to 265 degrees and stick it in the oven for 7 1/2 minutes. press the lights together and try to get the clips to lock back in. some of my clips were pretty beat up from prying the lights apart but its okay if they all dont lock it. i only had 1 or 2 not lock in and they are holding fine. i cooked the light for an extra 3 1/2 minutes and pressed together again just to be safe. trim any extra butyl off if it pours over the edge. i didnt have any that looked like a problem so i just left it go. install the last screw in the bottom back of the headlight housing now that the lights are back together, once again make sure its tight the rubber washer seals moisture out. here is the final product once i got them out of the oven. !!!!!!! :liar: [ATTACH=full]138051[/ATTACH] im giving them a few days to cure because my buddy was doing the retro fit at the same time as me and i was doing this out of extra headlights where he wasnt and needed them back together. he didnt order the dust caps so i had to let him have mine while i wait for the dust caps to arrive lol. should be in friday. so once i get them i will get pics of final wiring and install as well as silicone the wires coming out of the housing and sealing up around the strobes ( you can see the extra holes in the top reflectors [/QUOTE]
Insert quotes…
Verification
Post reply
Random media
Latest posts
Golf ball pistons
Latest: 6.0 Tech
44 minutes ago
7.3 Aftermarket
Will a 1996 F6TZ-9A451-F engine wiring harness work on a 1997 f250 HD ?
Latest: Patrick Feeley
Yesterday at 5:55 PM
94-97 Aftermarket
Heui Injection
Latest: Big Bore
Yesterday at 4:11 PM
7.3 Aftermarket
6.0 dropping boost
Latest: 6.0 Tech
Yesterday at 3:38 PM
6.0 Tech & FAQ
P24AF Code - Particulate Matter Sensor Code
Latest: jschildm
Wednesday at 8:52 AM
6.7 Tech
Members online
LivinAnAdvntr
Forums
Power Strokes
6.4 Aftermarket
Travish3's Projector retro fit guide(PIC HEAVY)
Top


 Will a 1996 F6TZ-9A451-F engine wiring harness work on a 1997 f250 HD ?
