You are using an out of date browser. It may not display this or other websites correctly.
You should upgrade or use an alternative browser.
You should upgrade or use an alternative browser.
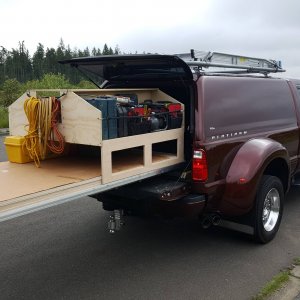
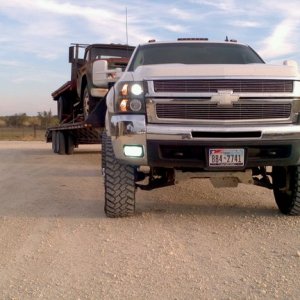
Daily Driver / Tow Pig Build....
- Thread starter mjonesjr
- Start date
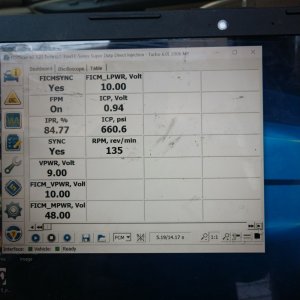
I moved my MAP line location today and could tell a big difference. The turbo spools faster, it hits 18-20 PSI (measured on the cold side of the intercooler) in no time now. The truck doesn't seem to lug as much now as it did right after the intercooler. The transmission shifts are different now as well. They seem to be firmer and not as much "slipping" into gear as before. I didn't notice the transmission shifting changing after the intercooler install, but I didn't drive the truck for 4 weeks before installing the intercooler (in the paint shop).
I'd like to see dyno results with the MAP line in both locations to verify what my findings are. I'm trying to round up a local dyno to put my truck on, if I do that is one of the things I will try.
Just as a side note, moving my boost sensor to the cold side of the intercooler, I'm only seeing 3 PSI drop across the intercooler at WOT. At normal driving speeds (55-60 mph) I'm not seeing any drop.
I installed a 24v, 1A diode into one of the OEM headlight bulb plugs. This will allow me to have my low and high beams on at the same time when I turn the high beams on.
This is ONLY possible because I'm running an upgraded headlight wiring harness. The OEM harness is only used as a trigger for the relays in the upgraded harness.
Low Beam Light Pattern:

Low & High Beam Pattern:

Diode Installed:


This is ONLY possible because I'm running an upgraded headlight wiring harness. The OEM harness is only used as a trigger for the relays in the upgraded harness.
Low Beam Light Pattern:
Low & High Beam Pattern:
Diode Installed:
96stacked&smoken
New member
Never seen that before.lol
Got the truck all waxed up. It's been 7 weeks since the new paint was put on so it was time. I used Meguair's Ultimate Wax in the paste form. It took a whole can to do a good wax job and took about 4 hours to wax it. She feels like slick glass now and even the paint looks deeper.

I started to update my e-fuel fittings today by installing a shut off valve before my fuel/water separator. This should make updating my soft lines under the truck and all my lines under the hood much easier since there will be no fuel being forced because of gravity.

I'm going to be cutting out as much soft line as possible and reducing the number of bends and curves in the soft line. I've got some 90* fittings I'm going to add to the filter base in the next week or so.
You used WAY too much wax. That stuff goes on thin thin thin. I guess U liked the smell too much?
Sent from my iPhone using
TapTalk
2000 Black DRW F-350
2012 pearl white Focus
96stacked&smoken
New member
A can is alot but looks great and it was fresh paint so it prolly needed it.
96stacked&smoken
New member
Reminds me, i need to wax mine.lol
SouthFlstrokin'
New member
- Joined
- May 18, 2011
- Messages
- 6,068
- Reaction score
- 0
That is a lot of truck to wax. I've never put wax on a vehicle too thin. I like to coat it on good and thick. The paint seemed to suck it in anyway since it was new paint.
Not a whole can thought. Half a can is even too much lol
Not when the directions on the can say to apply 2 coats for best results :morons:Not a whole can thought. Half a can is even too much lol
I got a new set of Mickey Thompson Classic II's for the ole girl. They are 16x8. I've got to order a new set of rear center caps though. The ones that came with the wheels are not deep enough for the hubs. Hopefully they will be here by Monday.


I'm also going to be getting the bed lined and rockers lined in a couple weeks. This is what a Photoshop rendering with the rockers look like.

I'm also going to be getting the bed lined and rockers lined in a couple weeks. This is what a Photoshop rendering with the rockers look like.
SouthFlstrokin'
New member
- Joined
- May 18, 2011
- Messages
- 6,068
- Reaction score
- 0
Don't do that to that beautiful paint.... Looks great now.
96stacked&smoken
New member
Wheels look great, but black bottom looks weird.lol
96stacked&smoken
New member
Looks killer. were did you get the center caps? mine didnt fit either.
SouthFlstrokin'
New member
- Joined
- May 18, 2011
- Messages
- 6,068
- Reaction score
- 0
I like it. Looking good.
I got them from Summit. They are Mickey Thompson part # 101220.Looks killer. were did you get the center caps? mine didnt fit either.
Countryboy07
Member
Truck Looks GREAT!!!! Please do not put the black at the bottom, it will ruin the look you have IMO.
I swapped out the front F-250 leafs (add-a-leaf installed in them) for a set of F-350 front leafs today. Holy crap the truck rides so much better. Now the rear is what is stiff on the ride. I need to get the front swap bar frame brackets and install the front sway bar.
The fender height with the F-250 springs and add-a-leafs was 39.5".

F-250 with add-a-leafs compared to the F-350 springs.

F-350 springs, F-250 springs, and the add-a-leaf for comparison.

F-250 leafs compared to the F-350 leafs. The F-250 leafs are considerably thicker than the F-350 leafs.


Both shackle bushings looked like this. All the spring and shackle bushings got replaced with poly bushings.


Shackle bushing out.

Leaf spring poly bushings.

Shackle and front part of the leaf installed.


All back together.

The final ride height with the F-350 springs installed is 39" to the fender. That gives me right at 1" lower than the rear with the 2" F-250 rear blocks installed. I can't decide if I want to install the 4" F-350 blocks and have right at 3" rake.

The fender height with the F-250 springs and add-a-leafs was 39.5".
F-250 with add-a-leafs compared to the F-350 springs.
F-350 springs, F-250 springs, and the add-a-leaf for comparison.
F-250 leafs compared to the F-350 leafs. The F-250 leafs are considerably thicker than the F-350 leafs.
Both shackle bushings looked like this. All the spring and shackle bushings got replaced with poly bushings.
Shackle bushing out.
Leaf spring poly bushings.
Shackle and front part of the leaf installed.
All back together.
The final ride height with the F-350 springs installed is 39" to the fender. That gives me right at 1" lower than the rear with the 2" F-250 rear blocks installed. I can't decide if I want to install the 4" F-350 blocks and have right at 3" rake.