blocknitup
New member
So I figured I'd do a little write up on upgrading the clutch hydraulics for the zf6 seeing I had a difficult time finding any info or even a write up for upgrading it. Some of this may be applicable to the 7.3 and 6.4 but I'm not positive if the clutch pedal brackets are the same but the master/slave and braided line is a direct swap for the 7.3 and 6.4 super duty. Thanks to tensixniner for the part numbers and guidance. By the way this setup makes the 4000# pressure plate and ceramic single disc very manageable even when in stop and go.
Here is the master/slave you can buy that is aluminum. Its for 7.3 super duty but works on all zf6. Part #: PF-9021


Here are the russell fittings that will replace your fittings in the slave and master. These are -4an but they also make -3an if thats what you would prefer.
Part #: 641001

This is the Earl's plumbing -4an 54" steel braided clutch hose as before you can also get this hose in -3an if so you choose. Part #: 64191954

First, drain the master/slave setup. Then knock the original roll pin out of the master and replace it with one the new russell fittings. Make sure you remove the old o-ring if it didn't come out when removing the original fitting. Then you'll repeat the same process for the slave.


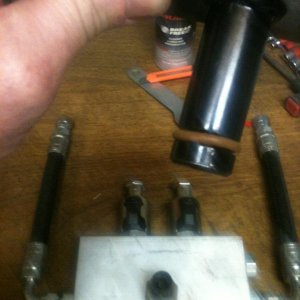
Next install your new line and get it into a vice as shown. The slave should be the lowest part and the master and reservoir should be the highest part. Here is a video on how to bleed this system its very simple. https://www.youtube.com/watch?v=AWxpUYiBHKQ The only thing I didn't do is check the master by locking the slave rod in place seeing as you can't use a steering puller because of our quarter turn slave. So I just bench bled it til no more bubbles then installed it and bled it one more time then installed the slave and it worked great.

Because of the excessive amount of flex in the plastic bracket (mine actually began to crack). I needed to figure out how to make it solid. If you want to go the easy route theres a company that makes a clutch bracket brace that goes between your plastic bracket and the firewall removing all of the flex. I can't name the company because it doesn't look like theyre a vendor but just pm me and I'd be glad to tell you who. Anyways this is how I made mine myself this is mainly just an outline. If you have the know how and can grind and weld you'll be able to figure it out. I used 2"x1/4" plate steel because its what I had laying around and it made for a very sturdy set up.
Here are some rough dimensions for the front 1/8" plate I used to clamp the brace behind the bracket to.


This is how you cut the 1/4" plate minus the tabs on the back side you'll make two of these with the larger cut out in the middle the washer plate and circle back stop on the master to pass through. Drill holes in the front plate to weld bolts in because you will not be able to get a wrench back there to bolt on the front.

Now you add the tabs onto one of the plates to squish the master between your bracket and the front plate you made on the front.


Now you need to weld your two pieces of 1/4 plate to each other. But you need to space them apart so they span the gap from the back of the bracket to the firewall. Here is a very poorly drawn picture that I hope helps.

Sorry I didnt get a final picture of my brace I was pretty worn out after making it but this is what the front looks like bolted in.

Also while I was in there I went on fleabay and typed in "ford clutch rod fix" and purchased the heim joint and bolt to replace the garbage plastic bushing. All you do for the is cut the original eyelet off slide the heim joint over then mark where the set screw is and drill a dimple for the set screw to tighten into then you're done.

I hope this will be of some help to others and if the moderators could sticky it that would be even better because I know how long it took me to find this info and some of it I had to figure out myself.
Here is the master/slave you can buy that is aluminum. Its for 7.3 super duty but works on all zf6. Part #: PF-9021
Here are the russell fittings that will replace your fittings in the slave and master. These are -4an but they also make -3an if thats what you would prefer.
Part #: 641001
This is the Earl's plumbing -4an 54" steel braided clutch hose as before you can also get this hose in -3an if so you choose. Part #: 64191954
First, drain the master/slave setup. Then knock the original roll pin out of the master and replace it with one the new russell fittings. Make sure you remove the old o-ring if it didn't come out when removing the original fitting. Then you'll repeat the same process for the slave.
Next install your new line and get it into a vice as shown. The slave should be the lowest part and the master and reservoir should be the highest part. Here is a video on how to bleed this system its very simple. https://www.youtube.com/watch?v=AWxpUYiBHKQ The only thing I didn't do is check the master by locking the slave rod in place seeing as you can't use a steering puller because of our quarter turn slave. So I just bench bled it til no more bubbles then installed it and bled it one more time then installed the slave and it worked great.
Because of the excessive amount of flex in the plastic bracket (mine actually began to crack). I needed to figure out how to make it solid. If you want to go the easy route theres a company that makes a clutch bracket brace that goes between your plastic bracket and the firewall removing all of the flex. I can't name the company because it doesn't look like theyre a vendor but just pm me and I'd be glad to tell you who. Anyways this is how I made mine myself this is mainly just an outline. If you have the know how and can grind and weld you'll be able to figure it out. I used 2"x1/4" plate steel because its what I had laying around and it made for a very sturdy set up.
Here are some rough dimensions for the front 1/8" plate I used to clamp the brace behind the bracket to.
This is how you cut the 1/4" plate minus the tabs on the back side you'll make two of these with the larger cut out in the middle the washer plate and circle back stop on the master to pass through. Drill holes in the front plate to weld bolts in because you will not be able to get a wrench back there to bolt on the front.
Now you add the tabs onto one of the plates to squish the master between your bracket and the front plate you made on the front.
Now you need to weld your two pieces of 1/4 plate to each other. But you need to space them apart so they span the gap from the back of the bracket to the firewall. Here is a very poorly drawn picture that I hope helps.
Sorry I didnt get a final picture of my brace I was pretty worn out after making it but this is what the front looks like bolted in.
Also while I was in there I went on fleabay and typed in "ford clutch rod fix" and purchased the heim joint and bolt to replace the garbage plastic bushing. All you do for the is cut the original eyelet off slide the heim joint over then mark where the set screw is and drill a dimple for the set screw to tighten into then you're done.
I hope this will be of some help to others and if the moderators could sticky it that would be even better because I know how long it took me to find this info and some of it I had to figure out myself.

