Forums
New posts
Search forums
What's new
New posts
New media
New media comments
New profile posts
Latest activity
New showcase items
New showcase comments
Media
New media
New comments
Search media
Members
Current visitors
New profile posts
Search profile posts
Showcase
New items
New comments
Latest content
Latest reviews
Latest updates
Search showcase
Log in
Register
What's new
Search
Search
Search titles only
By:
New posts
Search forums
Menu
Log in
Register
Install the app
Install
Forums
Power Strokes
6.0 Tech
Bulletproof Diesel Oil Cooler INSTALL
JavaScript is disabled. For a better experience, please enable JavaScript in your browser before proceeding.
You are using an out of date browser. It may not display this or other websites correctly.
You should upgrade or use an
alternative browser
.
Reply to thread
Message
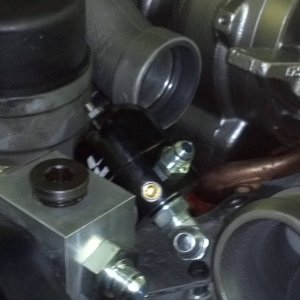
[QUOTE="Snake, post: 461073, member: 97"] 1. Evacuate air conditioner / recover air conditioning refrigerant. If you don’t have the proper equipment to complete this step and maintain compliance with EPA regulations, locate a shop in your area and have them do this for you (should cost around $40). **TIP** Disconnect a line immediately after the refrigerant is recovered. If you have to drive anywhere after this step, the air conditioning system will build pressure again. Hopefully it goes without saying that you’ll want to re-connect this line before you drive. 2. Disconnect / remove batteries. On the passenger side battery, loosen the negative battery connector and then the positive battery connector using an 8mm socket. Next, remove the long bolt with the wedge at the bottom that secures the battery to the battery tray using a 7mm socket. Repeat on the driver side battery if desired. I removed only the passenger side and used the battery tray as a staging area for tools, nuts/bolts/washers container, etc. If you don’t remove the driver side battery, disconnect the battery and cover the posts with a rag or towel. I chose to keep mine installed because it was one less part to remove and store. [ATTACH=full]95389[/ATTACH] 3. Drain coolant. Place a bucket under the plastic petcock located at the back and bottom of the radiator on the driver side and unscrew the petcock until coolant is draining from the radiator. Do not completely remove it. Once coolant has stopped flowing from this location, move your bucket under the large radiator hose, disconnect the hose clamp using a 7mm socket, and drain the remaining coolant. 4. Drain engine oil. Loosen the oil filter cap on top of the oil filter housing using a 36mm socket. You can either remove the cap and the oil filter entirely, or loosen the cap to an extent that allows the oil filter to pop up. The goal is to allow the oil to drain from the oil filter housing. 5. Remove grill. Unscrew the four 5.5mm bolts at the top of the grill. Gently pull the top of the grill shell away from the vehicle and use a pry bar (or long, flat head screw driver) to push down on the tabs holding the lower part of the grill shell in place. I placed a towel between the bottom of the grill and the top of the bumper to keep both from getting scratched. 6. Remove bumper. You can do this now or wait until later in the process, and I chose to leave it on. It’s one less part that you need to potentially store. It will need to be removed at some point in order to connect the oil lines to the oil filter mount. Loosen / remove the two 18mm bolts next to each tow hook and the 13mm bolts used to secure the bumper support brackets inside the front wheel well. 7. Remove air cleaner (air filter) assembly. Due to the popularity of aftermarket Cold Air Intakes (CAI’s), I did not include the steps for removing the stock air intake and filter. I have an Airaid cold air intake and you may have additional steps if you have a stock air intake or one from a different manufacturer. a. Disconnect the Mass Airflow sensor electrical connector b. Disconnect the filter minder assembly c. Loosen the clamp closest to the turbo using an 8mm socket d. Pull the entire air filter assembly up and out of the engine bay [ATTACH=full]95390[/ATTACH] 8. Remove the intercooler pipes. One pipe is connected to the compressor outlet of the turbo and the other is connected to the intake manifold at the intake elbow (90° elbow at the front of the intake manifold on top). Using an 11mm deep well socket, loosen the four clamps holding the two intercooler pipes in place and wiggle the pipes free. [ATTACH=full]95391[/ATTACH] 9. Remove the degas bottle. Disconnect the three hoses attached to the degas bottle: the engine vent hose (EGR cooler to degas bottle), radiator overflow hose, and degas bottle supply hose (underside of degas bottle). Remove the two 8mm bolts located near the wiper cowl that hold the degas bottle in place. Disconnect the radiator overflow hose from the radiator. [ATTACH=full]95392[/ATTACH] 10. Remove the turbo intake tube. This is the plastic tube attached to the compressor inlet of the turbo and connects the turbo’s compressor housing to the air filter assembly. Use an 8mm deep socket to loosen the clamp at the turbo, a 10mm socket to remove the 2 nuts that hold the turbo intake elbow and the FICM bracket together, and remove the turbo intake elbow. [ATTACH=full]95393[/ATTACH] [/QUOTE]
Insert quotes…
Verification
Post reply
Random media
Latest posts
Ford 7.3 Passenger Bank Dead
Latest: 6.0 Tech
19 minutes ago
7.3 Tech
J
6.4 spartan
Latest: jmathews90
Today at 6:16 PM
6.4 Performance
Show & Go/Going to Try this Out combo Build
Latest: Powerstroke Cowboy
Today at 9:06 AM
6.4 Aftermarket
Y
Fuel sending unit and wheel studs
Latest: Yojih123
Today at 1:00 AM
7.3 Tech & FAQ
Truck slipping into 4th
Latest: ju015dd
Wednesday at 10:39 PM
6.7 Tech
Members online
Lugger007
Forums
Power Strokes
6.0 Tech
Bulletproof Diesel Oil Cooler INSTALL
Top