Forums
New posts
Search forums
What's new
New posts
New media
New media comments
New profile posts
Latest activity
New showcase items
New showcase comments
Media
New media
New comments
Search media
Members
Current visitors
New profile posts
Search profile posts
Showcase
New items
New comments
Latest content
Latest reviews
Latest updates
Search showcase
Log in
Register
What's new
Search
Search
Search titles only
By:
New posts
Search forums
Menu
Log in
Register
Install the app
Install
Forums
Power Strokes
6.0 Tech
Bulletproof Diesel Oil Cooler INSTALL
JavaScript is disabled. For a better experience, please enable JavaScript in your browser before proceeding.
You are using an out of date browser. It may not display this or other websites correctly.
You should upgrade or use an
alternative browser
.
Reply to thread
Message
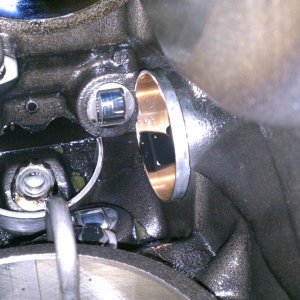
[QUOTE="Snake, post: 461075, member: 97"] 11. Remove the Fuel Injection Control Module (FICM). Remove the two 8mm bots at the back of the FICM (closest to the firewall) that hold the FICM to the driver side valve cover and then carefully unplug the three FICM connectors (X1, X2, and X3). **TIP** -- the connectors have locks on both sides that must be pushed in to remove them from the FICM. [ATTACH=full]95394[/ATTACH] 12. Disconnect the fuel lines from the oil filter / fuel filter housing. Two of the fuel lines will need an 11/16 open end wrench, one line will require a 13/16 open end wrench (return line to tank), and the banjo bolt at the housing will require a 19mm open end wrench. Remove the 10mm bolt in the bracket that holds the passenger side fuel line to the front of the intake manifold. Secure the other fuel lines to the side out of the way. **NOTE** The fuel lines do not have to be disconnected from the cylinder heads to install the Bulletproof Diesel oil cooler. If they are disconnected, the washers on the banjo bolts will have to be replaced. These lines are removed from my truck because we also replaced head gaskets while completing this install. [ATTACH=full]95395[/ATTACH] 13. Remove the oil filter / fuel filter housing and stand pipe. Remove the four T-45 Torx bolts that secure the housing to the oil cooler and remove the housing. Save the large o-ring between this housing and the oil cooler. The stand pipe (the plastic cylinder that the center of the oil filter slides onto) is held in place with a single T-27 Torx bolt. Remove that bolt and then the stand pipe. [ATTACH=full]95396[/ATTACH] [ATTACH=full]95397[/ATTACH] 14. Remove the upper radiator hose. Squeeze the spring clip holding the hose to the front cover at the thermostat and slide it up the hose. Do the same with the spring clamp holding the hose to the radiator and pull the hose free. [ATTACH=full]95398[/ATTACH] 15. Remove the belt (aka the accessory drive belt). It IS possible to remove the belt without removing the fan shroud, but it’s also a little more challenging. Use a long handle 1/2” drive ratchet to reach the square hole on the front of the tensioner pulley. Set the ratchet to loosen bolts, insert the ratchet drive (square part of the ratchet that holds the socket) into the hole, rotate the ratchet handle towards the driver side of the truck, and then pull the ratchet towards the passenger side. This will relieve the tension on the accessory drive belt and allow the belt to be slipped off of the alternator pulley. If you continue to pull on the ratchet and move the pulley further, there is a catch on the tensioner pulley that will hold the pulley in place and keep tension off the belt. Experienced technicians are even able to pull on the belt by hand and engage the catch! Regardless of the technique employed, the two 15mm bolts that secure the fan shroud to the front of the intake manifold will also have to be removed to allow the intake manifold to be pulled out. [ATTACH=full]95399[/ATTACH] 16. Remove the alternator. Disconnect the two-pin plug on the back of the alternator, remove the 10mm nut holding the ring terminal on the top of the alternator (for the red power wire that runs from the alternator to the passenger side battery), and remove the three 13mm bolts securing the alternator to the intake manifold. [ATTACH=full]95400[/ATTACH] 17. Remove the heater hose tube (passenger side). Remove the 8mm bolt that secures the heater tube to the side of the intake manifold. Option 1: bend this bracket slightly to allow the intake manifold to be removed without disconnecting the heater hose tube from the front cover. Option 2: In addition to removing the 8mm bolt on the side of the intake manifold, also remove the 8mm bolt that secures the heater hose tube to the front cover. **NOTE** There is an o-ring at this connection point and the o-ring often must be replaced before reinstallation. However, an o-ring is NOT included in the Bulletproof Diesel kit. [ATTACH=full]95401[/ATTACH] 18. Disconnect the Manifold Absolute Pressure (MAP) sensor hose by sliding the spring clamp up the hose and pulling the hose free of the intake manifold. [ATTACH=full]95402[/ATTACH] 19. Remove the turbo and turbo pedestal. Use an 11mm deep socket to loosen the clamps holding the down pipe and Y pipe to the rear of the turbo. **NOTE** The down pipe is the larger diameter pipe on the rear of the turbo that is connected to the turbine outlet. The Y pipe is the smaller diameter pipe on the rear of the turbo connected to the turbine inlet. Next, remove the two 10mm bolts holding the oil feed tube on top of the turbo and the 8mm bolt that holds the feed tube to the oil cooler. Remove the oil feed tube. You’ll replace the gasket on top of the turbo and the o-ring at the bottom of the tube with new ones provided by Bulletproof Diesel. Then remove the three 10mm bolts that hold the turbo to the turbo pedestal (two on the front of the turbo and one on the back side). Disconnect the variable vane hydraulic control valve electrical connector (aka, the VGT electrical connector). Use a pry bar to separate the turbo from the turbo pedestal. **NOTE** At this point in time, the goal is to break the turbo free of the pedestal, the oil drain tube, and the exhaust pipes. Once loose, use your hands to pull the turbo from the pedestal. You’ll see the oil drain tube sticking up from underneath where the turbo was sitting – this just pulls out. The drain tube o-rings can be thrown out (new o-rings are included in the Bulletproof Diesel kit). Finally, remove the four 10mm bolts that secure the turbo pedestal to the block and remove the pedestal. [ATTACH=full]95403[/ATTACH] [ATTACH=full]95404[/ATTACH] [ATTACH=full]95405[/ATTACH] 20. Disconnect the following electrical connectors: [INDENT]a. Injector Pressure Regulator (IPR) sensor – located at the rear of the engine on top of the HPOP cover directly next to the ICP sensor b. Injector Control Pressure (ICP) sensor – located at the rear of the engine on top of the HPOP cover directly next to the IPR sensor c. Engine Oil Temperature (EOT) sensor – located on top of the oil cooler next to the base of the oil filter housing d. Engine Oil Pressure (EOP) sensor – located on top of the oil cooler next to the based of the oil filter housing e. Exhaust Gas Recirculation (EGR) valve sensor – plugs into the EGR valve located at the front of the intake manifold on top f. Engine Coolant Temperature (ECT) sensor – located on the driver side of the front cover next to where the upper radiator hose connects g. Intake Air Temperature (IAT2) sensor – located on top of the intake manifold on the driver side h. Exhaust Backpressure (EBP) sensor – located on the driver side valve cover approximately half way between the front and back, below the degas bottle near the master cylinder (connector sits on top of a metal tube) i. Glow Plug Module (GPM) connectors – located at the front of the passenger side valve cover, these are the two connectors that plug into the Glow Plug Control Module[/INDENT] [/QUOTE]
Insert quotes…
Verification
Post reply
Random media
Latest posts
Ford 7.3 Passenger Bank Dead
Latest: 6.0 Tech
20 minutes ago
7.3 Tech
J
6.4 spartan
Latest: jmathews90
Today at 6:16 PM
6.4 Performance
Show & Go/Going to Try this Out combo Build
Latest: Powerstroke Cowboy
Today at 9:06 AM
6.4 Aftermarket
Y
Fuel sending unit and wheel studs
Latest: Yojih123
Today at 1:00 AM
7.3 Tech & FAQ
Truck slipping into 4th
Latest: ju015dd
Wednesday at 10:39 PM
6.7 Tech
Members online
Lugger007
Forums
Power Strokes
6.0 Tech
Bulletproof Diesel Oil Cooler INSTALL
Top