Forums
New posts
Search forums
What's new
New posts
New media
New media comments
New profile posts
Latest activity
New showcase items
New showcase comments
Media
New media
New comments
Search media
Members
Current visitors
New profile posts
Search profile posts
Showcase
New items
New comments
Latest content
Latest reviews
Latest updates
Search showcase
Log in
Register
What's new
Search
Search
Search titles only
By:
New posts
Search forums
Menu
Log in
Register
Install the app
Install
Forums
Power Strokes
6.0 Tech
Bulletproof Diesel Oil Cooler INSTALL
JavaScript is disabled. For a better experience, please enable JavaScript in your browser before proceeding.
You are using an out of date browser. It may not display this or other websites correctly.
You should upgrade or use an
alternative browser
.
Reply to thread
Message
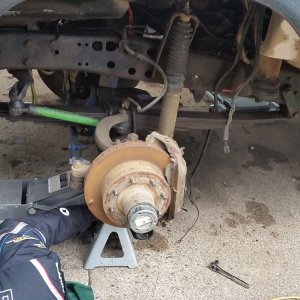
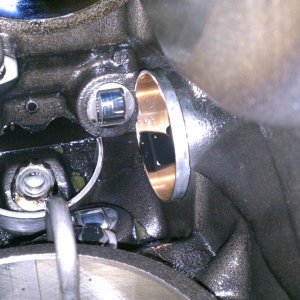
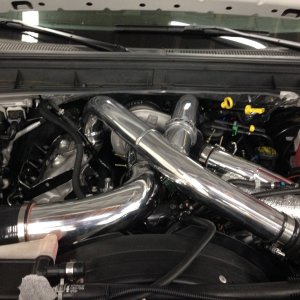
[QUOTE="Snake, post: 461080, member: 97"] 41. Assemble the oil filter adapter. Look down at the top of the oil filter adapter so the writing is legible. On the left side of the adapter are two ports: “oil in” and “oil out”. Thread a #12 JIC 90° elbow fitting into the oil in port finger-tight. This fitting will be fully tightened once the oil filter adapter is mounted to the truck (see Step 43). On the right side of the adapter are two more ports, also labeled “oil in” and “oil out.” Thread a #12 JIC straight fitting into the “oil out” port and tighten the fitting in the port using a 1 1/4” open end wrench. Plug each of the remaining open ports of the oil filter adapter with a #12 o-ring hex plug and tighten them using a 9/16” hex head socket (or hex key wrench). [ATTACH=full]95426[/ATTACH] [ATTACH=full]95427[/ATTACH] [ATTACH=full]95428[/ATTACH] 42. Mount the oil filter adapter to the oil filter mounting bracket. Insert the 5/16” x 1 1/4” bolt (the longer of the three 5/16” bolts provided) with a 5/16” flat washer through the oil filter mounting bracket and the hole at high point (top of the triangle) on the oil filter adapter. Use a 5/16” flat washer and nut on the oil filter adapter side to secure the bolt. The two shorter 5/16” bolts (3/4” long) also get a 5/16” flat washer and thread directly into the oil filter adapter through the oil filter mounting bracket. **TIP** Do not install the oil filter at this time. It’s easier to bolt the oil filter mounting bracket to the truck with the oil filter out of the way. [ATTACH=full]95429[/ATTACH] [ATTACH=full]95430[/ATTACH] 43. Mount the oil filter adapter to the vehicle. If you haven’t already removed the bumper, now is the time to do so (instructions were provided in Step #6). If you’ve used the correct oil hoses for the other steps, the only hose left in the kit is 56” long and has a straight fitting on one end and a 90° elbow fitting on the other end. As before, cover the open end of the straight fitting with duct tape to prevent debris from entering the line. Standing in front of the vehicle, locate the small gap between the frame and the core support just behind the tow hook bucket. Thread the straight fitting end of the hose through this opening and continue to feed the hose through. **TIP 1** To determine approximately how much hose is needed to reach the oil filter adapter (which will be located behind the front bumper on the driver side), continue to feed the hose into the engine bay until the 90° elbow fitting at the other end of the hose barely touches the inner sidewall of the driver side front tire when the hose is pulled straight. A visual inspection of the area where the oil filter adapter will mount should show the ends two oil hoses, one with a straight fitting and one with a 90° elbow fitting. Connect the 90° elbow fitting on the 56” oil hose to the JIC 90° elbow fitting (threaded into the “oil in” port of the oil filter adapter) and tighten using a 1 1/4” open end wrench. **NOTE** The JIC 90° elbow fitting on the oil filter adapter should still be able to swivel but the hose to fitting connection can be tightened. Connect the straight fitting on the 16” oil hose to the JIC straight fitting threaded into the “oil out” port of the oil filter adapter and tighten the connection using a 1 1/4” open end wrench. Next, locate the two 18mm bumper mounting bolts used to hold the bumper to the bumper frame rail (the bolts that thread through the bumper frame rail next to the tow hook). Insert these through the holes next to the driver side tow hook as if the bumper was being installed, mount the oil filter bracket to the backside of the bumper frame rail using these bolts, and then secure the oil filter bracket using the OEM hardware. Evaluate the routing of the oil hoses and adjust as needed (excess hose pushed into the engine bay, not rubbing on any sharp edges, etc.). Remember the JIC 90° elbow fitting threaded into the “oil out” port of the oil filter adapter? Adjust the angle of this fitting so it assists with the natural routing of the oil line. Most likely the fitting will be angled slightly towards the front of the truck. Tighten this fitting in the oil filter adapter using a 1 1/4” open end wrench. **TIP 2** Do not install the bumper at this time. After all components have been installed and fluids have been replaced, start the truck and visually inspect for leaks. It will be easier to look for and fix any leaks that are found if some of the larger vehicle parts have not been installed yet. **NOTE** My front bumper has aftermarket lights installed and the mounting location of the driver side light required me to modify the oil filter bracket. In my case, the oil filter adapter was lowered 3/4” by drilling new holes in the oil filter bracket and then the bracket was bent to move the oil filter closer to the frame rail. [ATTACH=full]95431[/ATTACH] [ATTACH=full]95432[/ATTACH] [ATTACH=full]95433[/ATTACH] [ATTACH=full]95434[/ATTACH] 44. Priming the system with oil. I purchased a $15 hand pump from Advance Auto to complete this step: [url]http://shop.advanceautoparts.com/webapp/wcs/stores/servlet/product_multi-use-pump-performance-tools_7071094-p[/url] [ATTACH=full]95435[/ATTACH] Fill the oil filter included in the Bulletproof Diesel kit with oil and place it nearby (upright, so the oil doesn’t spill out). On the truck, remove the plastic cap covering the “oil in” port on the Bulletproof Diesel Oil Transfer Block and fill the HPOP reservoir with clean motor oil. Repeat this step for the “oil out” port of the Oil Transfer Block and then replace the plastic caps to prevent debris from entering the HPOP reservoir. Next, hold the end of the 56” oil hose on the passenger side of the truck upwards and slowly pump clean motor oil down the hose to the heat exchanger. **TIP** The higher you hold the end of the hose, the greater the chances of having the oil make it to the heat exchanger. We also ensured we could easily re-route the hose under the battery tray and then shifted the hose to try to get as much hose as possible higher than the port on the heat exchanger. Once oil begins to drain from the oil filter adapter in the driver side front wheel well, install the oil filter. This provides a visual confirmation that the heat exchanger is filling with oil. Continue to pump clean motor oil through the oil hose until the hose is full or nearly full, remove the plastic cap covering the “oil in” port on the Oil Transfer Block, and connect the passenger side oil hose to this port. Tighten using a 1 1/4” open end wrench. The driver side oil hose will be routed over the fuel lines that are connected to the oil filter / fuel filter housing, so we installed that and connected the fuel lines before connecting the oil hose to the Oil Transfer Block. Space around the Oil Transfer Block will be very limited regardless of which step is performed first. [ATTACH=full]95436[/ATTACH] [ATTACH=full]95437[/ATTACH] [ATTACH=full]95438[/ATTACH] 45. Install the oil filter / fuel filter housing. **NOTE** The stand pipe will not be installed since the OEM oil filter is no longer used, nor are the T-45 Torx bolts. Use the four 8mm hex head bolts included in the Bulletproof Diesel kit to secure the oil filter / fuel filter housing to the Oil Transfer Block. The longer 8mm hex head bolts (40mm) will be installed on the passenger side of the Oil Transfer Block and the shorter 8mm hex head bolts (35mm) will be installed on the driver side of the Oil Transfer Block. First, locate the large OEM o-ring that went in between the oil filter / fuel filter housing and the OEM oil cooler. Place this into the groove on top of the Bulletproof Diesel Oil Transfer Block, then place the oil filter / fuel filter housing on top of the Oil Transfer Block. and torque to 11 ft/lbs. Thread the oil filter cap onto the top of the oil filter / fuel filter housing and tighten using a 36mm socket. [ATTACH=full]95439[/ATTACH] [ATTACH=full]95440[/ATTACH] 46. Connect the fuel lines to the oil filter / fuel filter housing. Just like during their removal, two lines need an 11/16” open end wrench, one line will require a 13/16” open end wrench, and the banjo bolt will require a 19mm open end wrench. The banjo bolt will also require two new copper washers or Viton sealing washers. Torque the passenger side fuel connection at the oil filter / fuel filter housing to 19 fl/lbs, the fuel line closest to front of the housing on the driver side to 32 ft/lbs, the middle line on the driver side to 19 ft/lbs, and the banjo bolt to 28 ft/lbs if copper washers are used (18 ft/lbs if Viton sealing washers are used). [ATTACH=full]95441[/ATTACH] 47. Connect the radiator hoses. Connect the upper radiator hose (the large hose that comes off the back of the radiator at the top) to the top of the front cover. Ensure the two spring clamps are on the hose then slide one end of the hose over the fitting on the back of the radiator and the other end of the hose over the fitting on the front cover. Squeeze the spring clamps and slide them towards the ends of the hose so they’re over both the hose and fitting. Lower radiator hose: Ensure the worm style clamp is loosely mounted on the lower radiator hose (bottom of the radiator on the passenger side) and connect the hose to the fitting on the radiator. Slide the worm clamp down towards the end of the hose so it’s over both the hose and the fitting and tighten securely using a 7mm socket. Finally, ensure the petcock at the bottom of the radiator on the driver side is closed. 48. Route / connect the driver side oil hose. Route the driver side oil hose under the air filter assembly, over the upper radiator hose, and over the fuel lines connected to the oil filter / fuel filter housing. Hold the open end of the hose that will connect to Oil Transfer Block upwards and fill the hose with clean motor oil until it is full or nearly full. Remove the plastic cap covering the “oil out” port on the Oil Transfer Block and connect the driver side oil hose to this port. Tighten using a 1 1/4” open end wrench. **NOTE** The driver side oil hose will be routed under the intercooler pipe that connects to the intake manifold but over the upper radiator hose. [ATTACH=full]95442[/ATTACH] [ATTACH=full]95443[/ATTACH] 49. Install the turbo pedestal and turbo. Use the four 10mm bolts to secure the turbo pedestal to the engine block and torque to 23 ft/lbs. Install the new drain tube o-rings included in the Bulletproof Diesel kit onto the drain tube, apply a light coat of clean engine oil to the o-rings, and insert the end of the drain tube into front of the HPOP cover. CAREFULLY position the turbo on the turbo pedestal and oil drain tube (any damage to the o-ring on the drain tube can cause oil leaks). Ensure the Y pipe (inlet) and down pipe (exhaust) are aligned at the rear of the turbo and loosely thread in the rear bolt of the turbo. Next, loosely thread in the two bolts that secure the front of the turbo to the turbo pedestal. The turbo should be seated on the turbo pedestal but capable of being shifted slightly to help fully align the Y pipe and down pipe. Some instructions recommend securing the Y pipe first, and others recommend securing the down pipe first. I chose to complete Y pipe first, then the down pipe. Once the Y pipe and turbo are lined up, tighten the clamp that holds the pipe and turbo together and torque to 53 in/lbs. Repeat for the down pipe but torque the down pipe clamp to 89 in/lbs. Starting at the rear most bolt, torque the three bolts that hold the turbo to the turbo pedestal to 28 ft/lbs. Next, install the oil feed tube. Replace the o-ring at the bottom of the tube with the new one supplied by Bulletproof Diesel, lightly coat the new o-ring with clean motor oil, and use the OEM locking bracket to secure the oil feed tube to the Oil Transfer Block. Torque the 8mm bolt on the bracket to 10 ft/lbs. Replace the gasket at the other end of the oil feed tube with the new one provided by Bulletproof Diesel and use the two 10mm bolts to secure the oil feed tube to the top of the turbo. Torque these bolts to 18 ft/lbs. Finally, connect the VGT electrical connector. 50. Install the turbo intake tube. Slide the turbo intake tube over the compressor inlet of the turbo. Ensure the two holes on the front of the turbo intake tube are through the bolts on the FICM bracket and then torque the clamp that holds the tube and turbo together to 9 ft/lbs and. Secure the turbo intake tube to the FICM bracket using two 10mm nuts and torque to 10 ft/lbs. Also see picture for Step 10. [/QUOTE]
Insert quotes…
Verification
Post reply
Random media
Latest posts
Ford 7.3 Passenger Bank Dead
Latest: 6.0 Tech
20 minutes ago
7.3 Tech
J
6.4 spartan
Latest: jmathews90
Today at 6:16 PM
6.4 Performance
Show & Go/Going to Try this Out combo Build
Latest: Powerstroke Cowboy
Today at 9:06 AM
6.4 Aftermarket
Y
Fuel sending unit and wheel studs
Latest: Yojih123
Today at 1:00 AM
7.3 Tech & FAQ
Truck slipping into 4th
Latest: ju015dd
Wednesday at 10:39 PM
6.7 Tech
Members online
Lugger007
Forums
Power Strokes
6.0 Tech
Bulletproof Diesel Oil Cooler INSTALL
Top