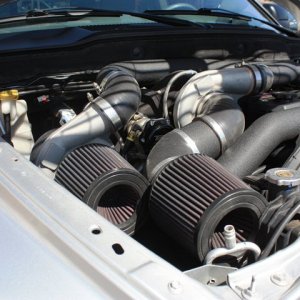
H&S IC Upgrade - Cutting the OEM clamp advice?

jwanck11

New member
Joined
Dec 31, 2014
Messages
192
Reaction score
0
I ordered the wrong IC piping replacement kit and got the one that requires reusing the OEM boot by cutting the clamp that secures it to the OEM pipe.

The instructions state to be careful not to nick the rubber - yes, I get that ...

Those who have successfully cut the clamp, any advice so that I avoid cutting into the rubber? I will be using a dremel with a cut off wheel.

Thanks
 

CoreyMS

New member
Joined
May 5, 2014
Messages
108
Reaction score
0
Put the dremel speed real low and start in the middle. I got it just about cut, and it popped loose. If you barley knick it like a rub mark I doubt it will hurt.
 

jwanck11

New member
Joined
Dec 31, 2014
Messages
192
Reaction score
0
Thanks Corey. Appreciate the advice.

I ordered the upgrade kit and should have ordered the OEM replacement upgrade kit.
 

jwalk09

New member
Joined
Aug 8, 2014
Messages
461
Reaction score
0
Location
VA
Cut carefully lol

Sent from my SAMSUNG-SGH-I337 using Tapatalk
 

jwanck11

New member
Joined
Dec 31, 2014
Messages
192
Reaction score
0
Thanks Mike for the offer - no worries, got that clamp off without touching the boot. You are correct Corey, it just pops open when the groove gets deep enough. I set the dremel on low and took my time.

The install is not bad, but took way longer than it should. The supplied bolts to seat the throttle body assembly wanted to cross thread - so lots of playing with them to make sure they went in straight. The metal pipe is also longer on the rise than it needs to be - again, not a big deal, I just had to stuff it pretty far into the 90 degree boot.

Light was gone by the time I finished (spent a fair amount of time looking through my shop and house for a spare 6mm allen as I dropped the one I was using somewhere into the engine bay) so I will take pictures tomorrow.
 

BIG JUICE

Member
Joined
Jun 5, 2013
Messages
780
Reaction score
0
Location
Valrico FLA
Yeah I forgot to post that too, the holes are not drilled correctly. I had to enlarge one of the holes so I didn't cross thread the bolts, someone needs to notify h and s that the jig they use for holes is wrong/off. And yeah that metal pipe is resting against my intercooler coolant lines, the plastic connector part. Not a great fit. Took a hour to try and get it right but still not in there right
 

jwanck11

New member
Joined
Dec 31, 2014
Messages
192
Reaction score
0
Yeah I forgot to post that too, the holes are not drilled correctly. I had to enlarge one of the holes so I didn't cross thread the bolts, someone needs to notify h and s that the jig they use for holes is wrong/off. And yeah that metal pipe is resting against my intercooler coolant lines, the plastic connector part. Not a great fit. Took a hour to try and get it right but still not in there right

I did not enlarge any holes and I got all 4 bolts to go in OK. Again, lots of fiddling and took my time. I started with the bottom rear bolt (nearest the firewall) as that one was the pita. The key for me was to run them in by hand to ensure they were threading true. I then snugged them with a drive and 6mm Hex tip (one of which is still lost somewhere in my engine or is somewhere on the road. lol) I was creating metal shavings when they were not going in straight and I had to back the bolts out which is never a good thing and made sure I cleaned out the throttle body assembly before connecting the boot.

As for the 90 rubber boot, you have to have it on an angle (not straight up) pointed back to the firewall. I'd assume its between 15 and 20 degrees. With it this way, I cleared everything - barely.

The only thing I would say absolutely ought to be adjusted is the length of the vertical pipe. It is 1" too long and rests somewhat into the curve of the rubber 90 degree boot. With the vibration of operation, I am afraid at some point this will eat into the inside of the rubber. I did loosen it today and lift that pipe up a bit and trued up the angles a bit better.

All in all, mine seems to fit nicely.
 

HS-MotorsportsZane

New member
Joined
Aug 8, 2013
Messages
469
Reaction score
0
Guy's, Sorry about the bolts being a pain to get in. These are all manufactured in a cnc mill, and it should be very hard to make the bolt pattern change. We do our absolute best to insure quality and fitment of all our products, and constantly check them when they come back from manufacturing. However we cannot address a problem unless we are called and made aware of it. We have gone through a few of these down in the stock room to verify fitment, and while the holes are tight if all the bolts are left loose they seem to fit and start correctly. I will agree however they are a little tighter than they should be. I will go and meet with our machine shop on Monday and bring this to their attention, so we can make sure we don't have any future issues. Once again guy's we apologize for the trouble and thanks for supporting us.
 

HS-MotorsportsZane

New member
Joined
Aug 8, 2013
Messages
469
Reaction score
0
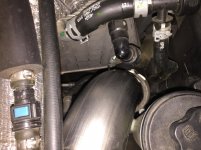
I also went and checked the pipe fitment on ours, and it seems when adjusted correctly it has plenty of clearance. If you are having an issue with this also please shoot us over a picture so if there is a problem we can get you taken care of.
 

Attachments

  • IMG_4289.jpg
    IMG_4289.jpg
    665.8 KB · Views: 97

jwalk09

New member
Joined
Aug 8, 2014
Messages
461
Reaction score
0
Location
VA
Bolts seemed to go in fine for me? Don't remember them being tight

Sent from my SAMSUNG-SGH-I337 using Tapatalk
 

Members online

No members online now.
Top