Forums
New posts
Search forums
What's new
New posts
New media
New media comments
New profile posts
Latest activity
New showcase items
New showcase comments
Media
New media
New comments
Search media
Members
Current visitors
New profile posts
Search profile posts
Showcase
New items
New comments
Latest content
Latest reviews
Latest updates
Search showcase
Log in
Register
What's new
Search
Search
Search titles only
By:
New posts
Search forums
Menu
Log in
Register
Install the app
Install
Forums
Non - Specific
Suspension, Drive Train, and Tires
One Up Off Road Traction bars.
JavaScript is disabled. For a better experience, please enable JavaScript in your browser before proceeding.
You are using an out of date browser. It may not display this or other websites correctly.
You should upgrade or use an
alternative browser
.
Reply to thread
Message
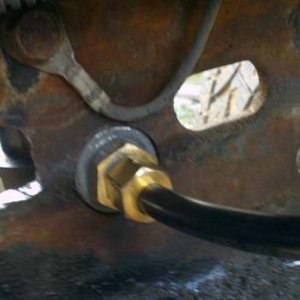
[QUOTE="dimon42, post: 1091977, member: 17219"] For anyone following this thread or searching in the future, I just wanted to followup that this is a KILLER setup. I found all the info online with a lot of reading and researching, so if I can return the favor by helping out even one person, I feel that I've contributed to the online community!! The One Up Offroad adaptable traction bar system with integrated block is super solid. ZERO axle wrap. Great fit and finish, and owner Dave is very helpful and supportive...more than happy to help ensure you end up with a good install. The inboard bags (Ride Rite kit #2550) mounted up great to the One Up Offroad jounce plate which becomes your lower airbag mount (you don't use the lower mounts from the Ride Rite kit). The One Up Offroad jounce/air bag plate is super beefy. I have utmost confidence in this setup towing my fifth wheel. I came up with a nice method to get the bags perfectly aligned where they wanted to sit naturally. Get the truck on level ground, and all "normalized". Mount the upper Ride-Rite mount. Mock bag in place to upper mount. Draw line around bottom round plate of bag. Cut a circular template to same OD as that part of airbag. Mark exact center of template and punch small hole for later. Put template on top of plate, aligning with the circle you drew on plate earlier. Using a hammer and punch, mark the top plate where you'll drill the lower air bag hole (a 90 degree drill will come in handy). Do the same on the other side, except in my case, I wanted to ensure the bags looked even, so although my center point came out about 1/8" different, I went ahead and took measurements from where the center hole was on the first plate and matched to right side. I could have been 1/8" off on my template placement. But I did want to at least sanity check that it was basically the same before just assuming I could transfer the measurements from the first one to the second one (with the though that it would be more important to let the bag landed where it wanted to vs. force it to be offset). The truck seems to be very symmetrical from one side to the other. So I ignored the template center and just matched the other plate, and so ended up with the same reveal on the bag placement side-to-side and front-to back, if that makes sense. I will say you need to be pretty competent to get this installed yourself, and have plenty of tools (a 1 5/16" impact is required for the front giant bolt of the traction bar). An extra hand would certainly help. Luckily my wife is a rad chick and helped me out where needed, mainly during the insertion of the new block. Be very careful when separating the truck/leaf from the top of the stock block(s). Things get real in a hurry when your truck has 8+ inches of gap between the bottom of the leaf spring and the top of the axle. I did this all in my driveway, and at first I couldn't safely get enough lift with a jack since the truck is so tall. I ended up chain-strapping the leaf to the frame so that when I lifted from the rear stock hitch, it would lift off more immediately without just drooping out. This proved to be very stable, but still obviously don't be an idiot and get your hand ANYWHERE in between. Tricky when you're trying to wrangle the One Up Offroad block in there!! I was able to bend the stock e-brake cable mounts into new positions and grab a hole that was in the One Up Offroad block, making for a factory install. Note that you see my Kelderman rear 2-stage air bag system. With the standard air helper springs installed, I can leave my Kelderman system at a nominal pressure as it doesn't need to be engaged to lift the truck anymore to compensate for the weight. The inboard Rite-Rite air helper springs are doing all the work, leaving the Kelderman to simply function as a bit of a cushioned buffer on hard edged bumps (freeway sections, speed bumps, etc.), which is why I bought it to begin with. It just can't compensate for 3,000 lbs of pin box weight on its own. [/QUOTE]
Insert quotes…
Verification
Post reply
Random media
Latest posts
Y
Fuel sending unit and wheel studs
Latest: Yojih123
Today at 1:00 AM
7.3 Tech & FAQ
Show & Go/Going to Try this Out combo Build
Latest: Powerstroke Cowboy
Yesterday at 7:47 PM
6.4 Aftermarket
Truck slipping into 4th
Latest: ju015dd
Wednesday at 10:39 PM
6.7 Tech
DEF in the fuel tank of 2013 F250 6.7
Latest: Crazy Canuck
Monday at 12:05 PM
6.7 Tech
I
Tuning the 7.3 in current times
Latest: INFRNL
Monday at 9:28 AM
7.3 Aftermarket
Members online
No members online now.
Forums
Non - Specific
Suspension, Drive Train, and Tires
One Up Off Road Traction bars.
Top