Forums
New posts
Search forums
What's new
New posts
New media
New media comments
New profile posts
Latest activity
New showcase items
New showcase comments
Media
New media
New comments
Search media
Members
Current visitors
New profile posts
Search profile posts
Showcase
New items
New comments
Latest content
Latest reviews
Latest updates
Search showcase
Log in
Register
What's new
Search
Search
Search titles only
By:
New posts
Search forums
Menu
Log in
Register
Install the app
Install
Forums
Non - Specific
Welding & Fabrication Forum
Welding Table Build
JavaScript is disabled. For a better experience, please enable JavaScript in your browser before proceeding.
You are using an out of date browser. It may not display this or other websites correctly.
You should upgrade or use an
alternative browser
.
Reply to thread
Message
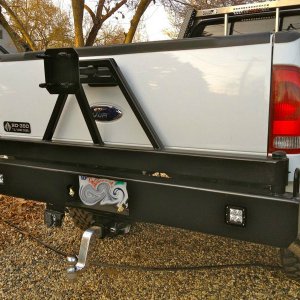
[QUOTE="emanmx11, post: 894522, member: 11517"] [ATTACH=full]126075[/ATTACH] [ATTACH=full]126076[/ATTACH] [ATTACH=full]126077[/ATTACH] The Base is made of 1/8 2in square tubing. As you can see i had to drop the toolbox frame below the base, to keep the tabletop height low enough and workable. I used 3/8 steel to drop it a total of 5 inches. The angle iron is 2 inch. [ATTACH=full]126078[/ATTACH] [ATTACH=full]126079[/ATTACH] [ATTACH=full]126080[/ATTACH] [ATTACH=full]126081[/ATTACH] [ATTACH=full]126082[/ATTACH] Base is complete, and i test fitted the tool box to ensure my measurements were correct. I cut plates out of 3/8 plate and welded them on all 4 corners to screw the casters into. Next are the legs of the table and the top rails. [ATTACH=full]126083[/ATTACH] [ATTACH=full]126084[/ATTACH] [ATTACH=full]126085[/ATTACH][ATTACH=full]126086[/ATTACH] [ATTACH=full]126087[/ATTACH] The legs are 1/8 2in square tubing, and the top rails are 3/16 2.5in square tubing. I hung the top rails 5 inches over the edge on either side so that i can extend the table further out, and build slide outs to slide out of the rails. Underneath the rails i drilled holes and welded nuts onto them with screw in handles to tighten down the slide out accesories. Next was the side mount for clamps.[ATTACH=full]126088[/ATTACH][ATTACH=full]126089[/ATTACH] The clamp rack is made entirely of 1in square tubing. As you can see i also welded in a different style clamp rack on the side across from the other. It is also made of 1in square tubing. [ATTACH=full]126090[/ATTACH] Next was the slide out mount for the chop saw. [ATTACH=full]126091[/ATTACH][ATTACH=full]126092[/ATTACH] [ATTACH=full]126093[/ATTACH] The slide out chop saw mount is made of 1/8in 2in square tubing. The plate that the chop saw sits on is 3/8 steel. I lowered the chop saw mount itself to be flush with the table to make cutting long material easier. Next is another clamp mount underneath the top rails. [ATTACH=full]126094[/ATTACH] [ATTACH=full]126095[/ATTACH] This mount is very simple, designed for smaller clamps. it is made of 1in square tubing as well, and I welded small plates on the end of each one to keep the clamps from sliding off. Next is the side mounts for the vise slide out, and Anvle slide out. [ATTACH=full]126096[/ATTACH] [ATTACH=full]126097[/ATTACH][ATTACH=full]126098[/ATTACH] The pictures for these aren't that great, but the are 4in long pieces of 2.5in 3/16 square tubing. I drilled holes in the bottom of these and welded nuts for screw in handles as well, to hold them steady while in use. Both the anvle and vise slide outs are interchangable on either side of the table. The plates that they are mounted on are 3/8 steel as well. Next was time to prep it for paint. I wire wheeled it and rubbed it down with laquer thinner a few times, then sprayed on the primer. [ATTACH=full]126099[/ATTACH] [ATTACH=full]126100[/ATTACH] [ATTACH=full]126101[/ATTACH] Next was time for paint. I went with a silver hammered metal finish. [ATTACH=full]126102[/ATTACH] [ATTACH=full]126103[/ATTACH] [ATTACH=full]126104[/ATTACH] Ontop of the table, a portion of it is a thick grate which will be used to plasma cut on. [ATTACH=full]126105[/ATTACH] Since the grate is 1 inch thick, and the top plate is 1/2 inch thick, I welded half inch thick spacers all around the table where the top plate will sit in order to make the grate level with the table top. This way, sliding material across the table when cutting would be a breeze. After some touch up paint and re installing the tool box, the top plate and grate were ready to be installed. [ATTACH=full]126106[/ATTACH] The finished product! I dont have any build pictures of the slide out on the other side of the table to help support long material when cutting, but i can give the details on it. [ATTACH=full]126107[/ATTACH][ATTACH=full]126108[/ATTACH] It is designed to slide out 40 inches, and still have plenty of support. It is made of 2in 3/16 square tubing. I painted the first 13 inches on each arm a bright orange, so that i know where to stop when pulling it out for use. I cant wait to start using this table! [/QUOTE]
Insert quotes…
Verification
Post reply
Random media
Latest posts
D
‘10 6.4 rebuild
Latest: Dieselnewb64
Today at 5:23 PM
6.4 Tech & FAQ
S
F-350 Dually tire size
Latest: Smokin 6.0
Today at 5:14 PM
6.7 Tech & FAQ
Won’t start issues
Latest: psduser1
Sunday at 8:30 PM
7.3 Tech & FAQ
Windshield washer fluid reservoir
Latest: psduser1
Sunday at 8:27 PM
7.3 Tech & FAQ
F-250 & F-350 gear ratio question ?
Latest: Mark Kovalsky
Sunday at 6:57 PM
6.7 Tech & FAQ
Members online
Patrick Feeley
Forums
Non - Specific
Welding & Fabrication Forum
Welding Table Build
Top