ZF6 -650 rebuild and other things I've done on my early 99 7.3 F350

Dave_Nevada

New member
Joined
Dec 13, 2017
Messages
125
Reaction score
0
Location
Reno, NV
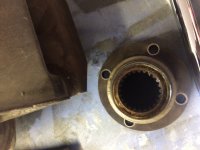
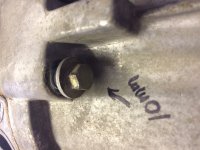
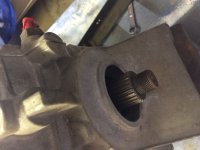
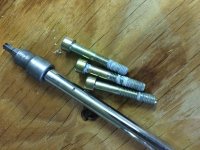
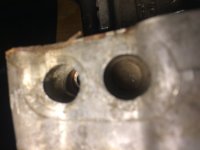
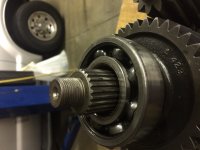
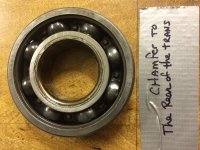
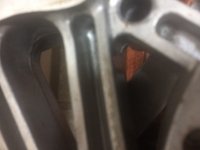
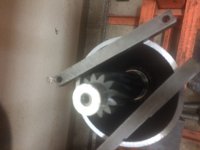
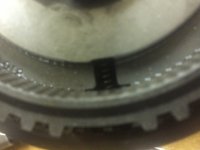
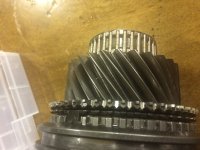
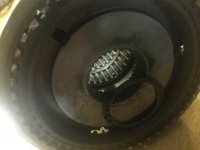
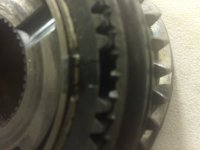
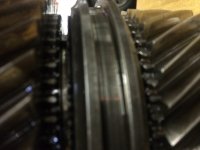
Yes, the throw out bearing retainer, lol.
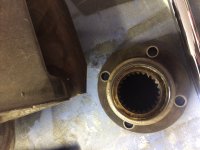
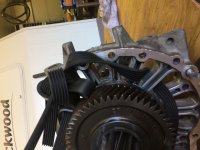
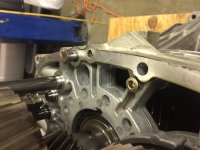
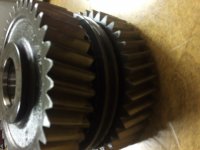
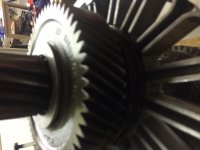
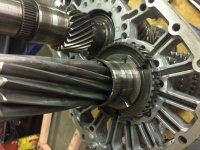
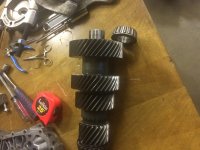
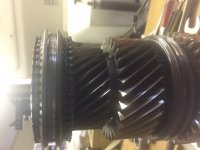
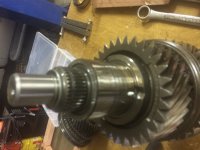
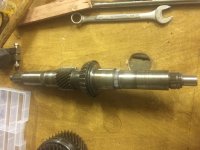
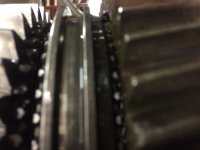
I'd be curious about the run out on the input shaft, as well.
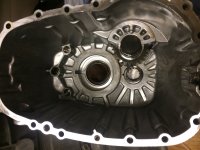
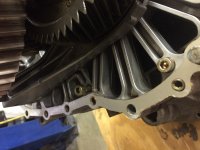
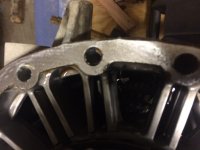
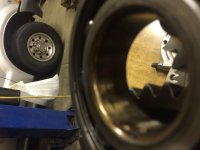
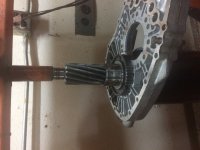
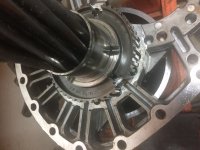
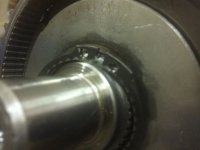
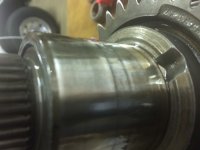
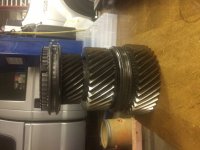
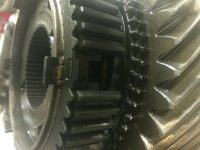
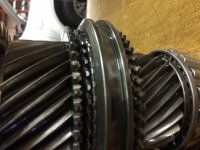
Both of my reman trans had been sleeved, I'd guess it's a popular corner to cut in the reman business. Not the best solution, obviously, just "good enough". I have no clue on availability of replacement hard parts for these gearboxes, maybe that is a factor.
I can tell you that when I pulled the 1st reman, the bushing was noticeably worn at about 80k miles, so the shaft was probably not true at the time of rebuild. However, that wasn't why I pulled the trans, lol.

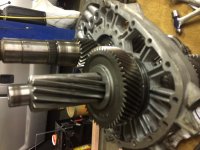
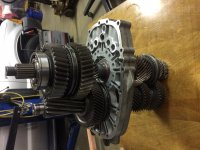
Parts are readily available for these transmissions. ALL of the rebuild shops have access to parts as easily as I do- I was able to get them and I'm not a rebuild shop.

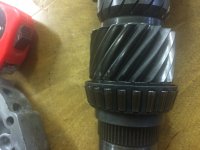
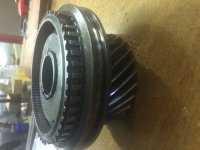
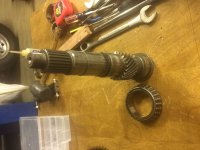
A 7.3 input shaft is $99.

A 6.0 is $129. Simply put, there's no excuse to do shoddy rebuild work on a ZF6.

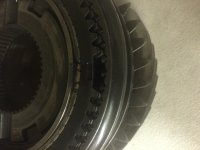
If I personally received a rebuilt with a sleeve installed- that fact right there would make me question 'what did they do inside?"

I'd promptly return their transmission demanding a refund.

As a matter of fact, I was going to buy a rebuilt and install it because I knew the daunting task of a ZF rebuild. But I chose to 'roll my own'. After hearing all this, I'm glad I did.

I cannot tell you how freaking angry I would have been if one arrived and it had a sleeve installed instead of a new input shaft. :biggun::wtf::cursing:

Reputable trans shops DO NOT DO THAT. I don't care what they're rebuilding, ZF's, Toploaders, etc.

For example: David Kees out of Texas, probably the Top Dog in the country for Ford Toploaders doesn't do that.

These shops that do that sleeve crap on rebuilds are taking advantage of those who don't know any different.

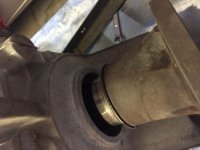
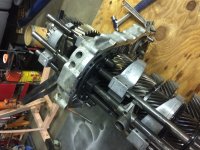
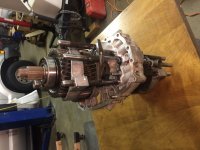
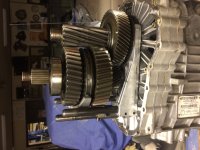
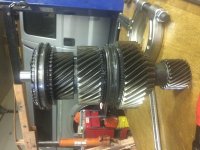
Since I literally rebuilt my ZF6, I know first hand what it takes to swap an input shaft.

Let me assure you, if it's torn down, it's NOTHING, NADA to do so.

It would really make me wonder if they did an 'Okie Rebuild'

Okie Rebuild: entails a trip to the wash house to shoot the grease and dirt off and a rattle can of paint.

Lipstick on a pig mean anything to you?

Maybe they just changed synchros and called it 'good'. That too is B.S.

Maybe one of you can write them and ask 'Why you are using a sleeve on the input shaft?"

The answer would be most interesting.

Bottom line; I suspect someone is getting cheated here because they don't know any different.

At $1600 to $2500, one has to ask, just what did they do?

If I had the money, I'd order one from each rebuild shop and tear each one down to inspect exactly what they did.

That's really the only way of getting to the truth. :thumbup:
 
Last edited:

Dave_Nevada

New member
Joined
Dec 13, 2017
Messages
125
Reaction score
0
Location
Reno, NV
Thats a good solution!

I took the quick n dirty approach. Since the bearing race is hardened steel and pressed on, its fairly brittle and under a lot of tension. You can take a small cut-off wheel and cut about 1/3 of the way through the race, then one solid smack with a hammer and chisel in that cut and the race will crack and fall right off.

The race is only about $11 and replacement is advisable anyways.

Yeah, I though about the cutoff wheel approach. But I also know O'Tooles law would have bit me hard in the 6, and I would have slipped and buggered the mainshaft.

Plunk down another 350 bones for a new mainshaft. Arg! :drool: So MONEY (or me not wanting to spend it) is the main reason I thought of the tube.

Choice time: $50 for sure, or possibly $350. I saw $50 as an 'insurance fee'.

Hell, I buy insurance to replace what I cannot afford to buy outright, don't you?

If you score a mainshaft, you're screwed if you want to run that dude under a load. Those mainshafts are case hardened in the factory, which means, if you gouge them, that's the place it will break under load.

Case hardening will harden the surface for wear purposes but leave the core somewhat flexible to prevent stress cracks from torsional load forces.

Thus, the only difference between the 7.3 ZF6-650 regular mainshaft and the 6.0 ZF6-750 mainshaft is the case hardening depth. The 6.0 mainshaft is tougher than the 7.3 mainshaft (by design).

Ceramic tile can break at the score on its surface, just like glass and any other hard surface. Same idea with a case hardened metal.

That said, I'm also one that had the time to figure out lots of 'workarounds' when rebuilding the trans. I brought my 2000 'X' out of mothballs to act as my ride for the interim. but I also recognize not everyone can do that.
 
Last edited:

Dave_Nevada

New member
Joined
Dec 13, 2017
Messages
125
Reaction score
0
Location
Reno, NV
The second pic is the quill?
As far as sleeving the input shaft, that should be fine, as long as the sleeve is Pressfit to the input shaft.
No needle bearings, Kevlar, whatever for the bearing surface.

I've given your statement some serious thought- and I think you're dead on IF the runout on the sleeve is .001- .0015 or less, AND you install a bronze Oilite bearing (as you have done). That's some wise thinking. :thumbup:

The thing that occurs with needle bearings on an input shaft is gouges. Those gouges have a displaced ripple effect (look closely) which would cause a replicating effect on the sleeve- granted, not as extreme. It is this rippling effect that troubles me.

If you've ever turned metal on a lathe with a dull cutting bit, you'd instantly see the same effect. The metal actually gets moved around (stacked up) away from the cutting bit tip due to frictional radial heat when it should have been removed from the object you're turning. This phenomena occurs with hard surface metal- think input shaft.

That is why I view the input shaft sleeve and DRY NEEDLE bearings with such disdain.

Therefore, if (a BIG IF) you can achieve a sleeve installation without the ripple effect from the input shaft AND install a softer bronze bearing in your flywheel, I'd say this repair would last a good amount of time. However, you're looking at machining costs to make another Oilite fit at clutch change time (providing the sleeve lasts).

So in the long run, you're still looking at a new input shaft.

But to install the needle bearing provided in the sleeve kit- one has to ask, why are you installing the very object that caused the problem in the first place? And what happens when the replacement sleeve goes away, because it will.

Bottom line- you're in for a new input shaft no matter what. Like I said before, you're just kicking the can down the road with this sleeve kit (as sold). What you really need to fix the problem is the sleeve, and a bronze OILITE bearing.

In any case, throw that needle and that stupid Kevlar bearing as far as you can into the field never to be seen again.

If you don't, your Grandpa will kick you square in the arse with his size 10 steel toed combat boots when you two meet up again. numbskull. Take note of his laughing. That's me laughing at numbskulls and needle bearings on input shafts. :pointlaugh::morons:LOL:evil
To those who need a reminder of Dear Old Grandpa- watch this. https://www.youtube.com/watch?v=pdtWATUCz-8
 
Last edited:

Dave_Nevada

New member
Joined
Dec 13, 2017
Messages
125
Reaction score
0
Location
Reno, NV
Cut straight to 3:22.

Replace his words with 'No man ever installs a needle bearing on an input shaft..."

HAHAHAHAHAHAHHAHAHAHA LOL
 
Last edited:

Dave_Nevada

New member
Joined
Dec 13, 2017
Messages
125
Reaction score
0
Location
Reno, NV
ZF6- Rear Case Images

See attached for images during my tear down process
 

Attachments

  • IMG_0380.JPG
    IMG_0380.JPG
    1.1 MB · Views: 66
  • IMG_0374.JPG
    IMG_0374.JPG
    1.1 MB · Views: 67
  • IMG_0383.JPG
    IMG_0383.JPG
    1.4 MB · Views: 65
  • IMG_0378.JPG
    IMG_0378.JPG
    1.7 MB · Views: 63
  • IMG_0376.JPG
    IMG_0376.JPG
    815.2 KB · Views: 68

Dave_Nevada

New member
Joined
Dec 13, 2017
Messages
125
Reaction score
0
Location
Reno, NV
ZF6 More Rear Case Pics

Addendum to previous pics
 

Attachments

  • IMG_0383.JPG
    IMG_0383.JPG
    1.4 MB · Views: 55
  • IMG_0381.JPG
    IMG_0381.JPG
    1.4 MB · Views: 57
  • IMG_0370.JPG
    IMG_0370.JPG
    1.3 MB · Views: 58
  • IMG_0373.JPG
    IMG_0373.JPG
    1.2 MB · Views: 52
  • IMG_0371.JPG
    IMG_0371.JPG
    1.2 MB · Views: 64

Dave_Nevada

New member
Joined
Dec 13, 2017
Messages
125
Reaction score
0
Location
Reno, NV
ZF6 More Rear Case Pics

Addendum to Rear Case Pics
 

Attachments

  • IMG_0380.JPG
    IMG_0380.JPG
    1.1 MB · Views: 55
  • IMG_0372.JPG
    IMG_0372.JPG
    1.1 MB · Views: 54
  • IMG_0341.JPG
    IMG_0341.JPG
    1.1 MB · Views: 49
  • IMG_0379.JPG
    IMG_0379.JPG
    1 MB · Views: 48
  • IMG_0368.JPG
    IMG_0368.JPG
    1,019.7 KB · Views: 51

Dave_Nevada

New member
Joined
Dec 13, 2017
Messages
125
Reaction score
0
Location
Reno, NV
ZF6 Intermediate Housing tear-down pics

Intermediate housing tear-down

Note*** My Early 99 had three Allen bolts securing the Intermediate housing to the Main case. Later models (and replacement main cases) have 2.

Take note of the electrolysis (corrosion) on the Allen bolt threads. They are steel against aluminum. Someone on the last rebuild didn't properly coat them with Never-Seize. This phenomena is why homes back in the 70's that used aluminum wiring burned down from heat generated on the contacts of aluminum wire to copper breaker switches. Dissimilar metals (molecular structures) always try to balance themselves of free electrons, producing the natural end result, a sulfate (base metal salt).

Note to self- make sure you bathe them in Never-Seize.
 

Attachments

  • IMG_0399.JPG
    IMG_0399.JPG
    1.7 MB · Views: 60
  • IMG_0400.JPG
    IMG_0400.JPG
    1.5 MB · Views: 62
  • IMG_0401.JPG
    IMG_0401.JPG
    1.4 MB · Views: 61
  • IMG_0396.JPG
    IMG_0396.JPG
    1.3 MB · Views: 66
Last edited:

Dave_Nevada

New member
Joined
Dec 13, 2017
Messages
125
Reaction score
0
Location
Reno, NV
ZF6 Intermediate Housing tear-down pics

More Intermediate Housing Tear Down pics
 

Attachments

  • IMG_0403.JPG
    IMG_0403.JPG
    1.3 MB · Views: 63
  • IMG_0404.JPG
    IMG_0404.JPG
    1.3 MB · Views: 67
  • IMG_0409.JPG
    IMG_0409.JPG
    1.2 MB · Views: 58
  • IMG_0406.JPG
    IMG_0406.JPG
    1.2 MB · Views: 58
  • IMG_0386.JPG
    IMG_0386.JPG
    1.2 MB · Views: 64

Dave_Nevada

New member
Joined
Dec 13, 2017
Messages
125
Reaction score
0
Location
Reno, NV
ZF6 Intermediate Housing tear-down pics

And some more pics
 

Attachments

  • IMG_0395.JPG
    IMG_0395.JPG
    1 MB · Views: 57
  • IMG_0394.JPG
    IMG_0394.JPG
    1,017.6 KB · Views: 56
  • IMG_0387.JPG
    IMG_0387.JPG
    989.6 KB · Views: 58
  • IMG_0405.JPG
    IMG_0405.JPG
    887.9 KB · Views: 58
  • IMG_0388.JPG
    IMG_0388.JPG
    891.8 KB · Views: 50

Dave_Nevada

New member
Joined
Dec 13, 2017
Messages
125
Reaction score
0
Location
Reno, NV
ZF6 Mainshaft and Countershaft disassembly pics

Mainshaft and Countershaft disassembly pics
 

Attachments

  • IMG_0424.JPG
    IMG_0424.JPG
    1 MB · Views: 53
  • IMG_0425.JPG
    IMG_0425.JPG
    903.4 KB · Views: 53
  • IMG_0426.JPG
    IMG_0426.JPG
    1.3 MB · Views: 51
  • IMG_0427.JPG
    IMG_0427.JPG
    1,016.3 KB · Views: 56
  • IMG_0428.JPG
    IMG_0428.JPG
    855.1 KB · Views: 51

Dave_Nevada

New member
Joined
Dec 13, 2017
Messages
125
Reaction score
0
Location
Reno, NV
ZF6 Mainshaft and Countershaft disassembly pics (more)

Mainshaft and Countershaft disassembly pics (more)
 

Attachments

  • IMG_0429.JPG
    IMG_0429.JPG
    830.5 KB · Views: 53
  • IMG_0430.JPG
    IMG_0430.JPG
    1.4 MB · Views: 44
  • IMG_0431.JPG
    IMG_0431.JPG
    896 KB · Views: 52
  • IMG_0432.JPG
    IMG_0432.JPG
    1.2 MB · Views: 53
  • IMG_0445.JPG
    IMG_0445.JPG
    1.1 MB · Views: 53

Dave_Nevada

New member
Joined
Dec 13, 2017
Messages
125
Reaction score
0
Location
Reno, NV
ZF6 Mainshaft and Countershaft disassembly pics (and more)

Mainshaft and Countershaft disassembly pics (and more)
 

Attachments

  • IMG_0446.JPG
    IMG_0446.JPG
    1.2 MB · Views: 45
  • IMG_0447.JPG
    IMG_0447.JPG
    1,023.5 KB · Views: 47
  • IMG_0448.JPG
    IMG_0448.JPG
    978 KB · Views: 44
  • IMG_0449.JPG
    IMG_0449.JPG
    1 MB · Views: 46
  • IMG_0450.JPG
    IMG_0450.JPG
    1.1 MB · Views: 34

Dave_Nevada

New member
Joined
Dec 13, 2017
Messages
125
Reaction score
0
Location
Reno, NV
ZF6 Mainshaft and Countershaft disassembly pics (und more)

Mainshaft and Countershaft disassembly pics (und more)
 

Attachments

  • IMG_0451.JPG
    IMG_0451.JPG
    1,003.6 KB · Views: 36
  • IMG_0453.JPG
    IMG_0453.JPG
    1 MB · Views: 35
  • IMG_0454.JPG
    IMG_0454.JPG
    1 MB · Views: 37
  • IMG_0455.JPG
    IMG_0455.JPG
    988 KB · Views: 38
  • IMG_0456.JPG
    IMG_0456.JPG
    1.3 MB · Views: 36

Dave_Nevada

New member
Joined
Dec 13, 2017
Messages
125
Reaction score
0
Location
Reno, NV
ZF6 Mainshaft and Countershaft disassembly pics (JA!! more)

Mainshaft and Countershaft disassembly pics (JA!! more)
 

Attachments

  • IMG_0457.JPG
    IMG_0457.JPG
    1.1 MB · Views: 41
  • IMG_0459.JPG
    IMG_0459.JPG
    1.1 MB · Views: 35
  • IMG_0460.JPG
    IMG_0460.JPG
    1 MB · Views: 38
  • IMG_0461.JPG
    IMG_0461.JPG
    982.2 KB · Views: 37
  • IMG_0462.JPG
    IMG_0462.JPG
    1.1 MB · Views: 39

Dave_Nevada

New member
Joined
Dec 13, 2017
Messages
125
Reaction score
0
Location
Reno, NV
ZF6 Mainshaft and Countershaft disassembly pics (JA!! und more)

Mainshaft and Countershaft disassembly pics (JA!! und more)
 

Attachments

  • IMG_0463.JPG
    IMG_0463.JPG
    1.2 MB · Views: 40
  • IMG_0464.JPG
    IMG_0464.JPG
    1.1 MB · Views: 37
  • IMG_0465.JPG
    IMG_0465.JPG
    1.1 MB · Views: 37
  • IMG_0474.JPG
    IMG_0474.JPG
    1.4 MB · Views: 33

Dave_Nevada

New member
Joined
Dec 13, 2017
Messages
125
Reaction score
0
Location
Reno, NV
ZF6 Mainshaft and Countershaft disassembly pics (JA!! und more und more)

Mainshaft and Countershaft disassembly pics (JA!! und more und more)
 

Attachments

  • IMG_0477.JPG
    IMG_0477.JPG
    959 KB · Views: 28
  • IMG_0501.JPG
    IMG_0501.JPG
    1.2 MB · Views: 30
  • IMG_0502.JPG
    IMG_0502.JPG
    824.6 KB · Views: 31
  • IMG_0503.JPG
    IMG_0503.JPG
    992.3 KB · Views: 32
  • IMG_0504.JPG
    IMG_0504.JPG
    935.3 KB · Views: 33

Dave_Nevada

New member
Joined
Dec 13, 2017
Messages
125
Reaction score
0
Location
Reno, NV
ZF6 Mainshaft and Countershaft disassembly pics (JA!! Heidi ist wunderbar!)

Mainshaft and Countershaft disassembly pics (JA!! Heidi ist wunderbar!)
 

Attachments

  • IMG_0505.JPG
    IMG_0505.JPG
    1 MB · Views: 37
  • snychro_ring2.JPG
    snychro_ring2.JPG
    1,014.7 KB · Views: 35
  • synchro_ring.JPG
    synchro_ring.JPG
    890.4 KB · Views: 36
  • h.png
    h.png
    18.2 KB · Views: 46

Dave_Nevada

New member
Joined
Dec 13, 2017
Messages
125
Reaction score
0
Location
Reno, NV
Okay,

One thing I didn't mention in all this is something about manuals. The fact that I found use of both of the Ford and GM ZF6 rebuild manuals along with disassembly pics essential for my rebuild.

Since this was my first attempt at rebuild of this trans, I wanted all I could get. I'm no stranger to engines, complex machinery, electronics, radios, computer systems, etc.

I'm of the belief that if you can read, you can do it.

The only thing you can't do- is what you don't try. This transmission is no different. The human brain amazes me if you APPLY IT.

Anyway, I hope my information is useful to someone else who decides they want a quality rebuild and to learn this trans inside and out.

I have more pics, I'll post more later. Right now, I have a downed tree to 'cut and buck' from a recent storm.

Later Gators.
 

Jomax

Active member
Joined
May 18, 2011
Messages
8,576
Reaction score
7
Location
Arizona
Jomax, Michelin's got you a little cranky?


My personal experience is I've had nothing but good tread wear and ride with them.

I don't run oversize tires, nor are they used on a 4x4.


They work great on the highway, carry plenty of load, are very quiet and they have incredible wear. I rotate my tires frequently to get maximum wear life and make sure tire pressure is maintained. No complaints whatsoever.


But that's my experience with them, your's may be different.


I find preference for types of tires and the job they're supposed to do, not just brand, much more applicable in these conversations.


True, there are some real dogs out there for our trucks. But Diesels in general are pretty hard on any tire, regardless of brand.


But saying "...screw Michelin..." without stating your experience and why is what jurisprudence calls leading the witness' in a court room. It's irrelevant without a followup statement as to why you made the statement.


Care to share your experience? :D


Sure lol, Michelin AT2. Belts breaks and tread separation issues, I totaled my parents excursion. Tires were 3 years old. Had three tires do it, only this last time, I blew on the rear while towing a 24ft enclosed trailer.. jack knifed going 70mph.. the tread blew off the tire, the thing still had air in it!

3 personal friends that also had the same issues.. one friend on his Chevy dually had the belts break on ALL 6 tires within a 3 year period, keep in mind these aren’t abused vehicles. Other friend has the Michelin LTX where the tread just started to peel off...


The kicker? Discount Tire knows the AT2 has issues, which means Michelin knows... yet they won’t do a safety recall..

Just lost all hope in the Michelin truck tires.


Sent from my iPhone using Tapatalk
 

Members online

No members online now.
Top