ZF6 -650 rebuild and other things I've done on my early 99 7.3 F350

Barnbuilder

Member
Joined
Oct 18, 2011
Messages
379
Reaction score
0
Location
Waxhaw, NC
Was going to ask about the bushings on the bracket, haha. After having one pedal break I get paranoid about it happening again, especially at an intersection. I think my trans needs a rebuild so whenever you're ready let me know. Haven't had time to drain the fluid or pull the PTO cover off to see whats wrong.
 

Dave_Nevada

New member
Joined
Dec 13, 2017
Messages
125
Reaction score
0
Location
Reno, NV
Yeah, those plastic nylon bearings can be had from McMasters, but that's just putting off the future breakage. I want it to last, so I'm going to spec the pedal tree and look into building a plate steel one. I keep reading about broken pedal trees and I'm not one of those people who thinks 'that'll never happen to meeeeeee".

BS!! I have an acronym for that: Y.E.T.S.

You're Eligible Too Stupid!

So yeah, I can't believe the pedal tree is made out of aluminum and plastic, but wait, yes I can. It's modern 'economizing' - AKA, TIGHTWAD Design, INC. They save 2 cents on metal, and we get to grab our ankles. :cursing:

Like I said before, Ford, GM, Mopar, doesn't matter. They're all doing it.

On your trans, what seems to be the issue?

I'm in Nevada, so you're not likely to see me outside your driveway with my rollback.
 
Last edited:

Barnbuilder

Member
Joined
Oct 18, 2011
Messages
379
Reaction score
0
Location
Waxhaw, NC
Was towing the dump trailer when transmission made a loud bang and lost forward momentum. Can shift into all the gears but nothing happens. I'm guessing the transmission. Hopefully later this week I can get under the truck.
 

psduser1

Active member
Joined
May 22, 2011
Messages
3,815
Reaction score
20
Location
on the road
Very detailed writeup!
Couple of trans shops around me won't even touch these, so props for the details!
I've been using oillite bushings for the pilot for several thousand miles now.
They do wear out, but at least the input shaft doesn't get destroyed. And, they are easily machined to fit the repair sleeve, if you shaft is beyond its service life.
 

Dave_Nevada

New member
Joined
Dec 13, 2017
Messages
125
Reaction score
0
Location
Reno, NV
Just curious, you didn't mention anything about reverse movement. I assume without forward motion, you would not have reverse either.

If your vehicle is a 4x4, I'd check the transfer case first. That's much easier to pull and diagnose than ripping the ZF6 out. Transfer cases are simple as hell to fix.

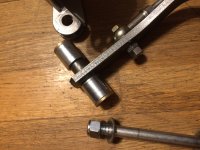
Either way, get that dude up off the ground about 4" off the wheels with jackstands, then fire it up and go through the gears. Peek under the truck while it is in gear starting at the driveline/pinion area.

I have heard of folks stripping a pinion/ring of its teeth from heavy loads. My brother is a heavy equipment mechanic, and he worked fleets and for stealerships and private outfits. BAR NONE, the drivers for logging trucks were the worse animals he'd ever encountered. They were always stripping ring gears.

If it's that, you can't go anywhere.

On the other end, you could have broken your input shaft or a drive gear/chain in the transfer case.

Here's how I'd approach your situation:
1st- look at what's happening with the driveline/pinion of your rear end.
2nd- Observe the output of the transfer case
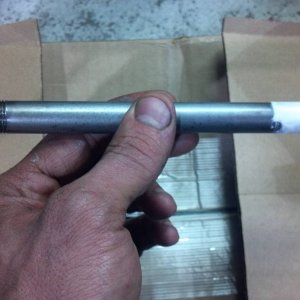
3rd - Drain the fluid in your trans (capture it as not to waste it) pull the PTO cover and look inside. Here's where a nice fiber optic camera comes in handy. Truly, they are well worth the money to invest in. You can use them to look at your clutch, back of your clutch release arm, inside your trans, etc

If these check out, you have a severe issue with the trans. Possibly a stripped gear or broken mainshaft? Not to worry, all those parts are available.

Fixing this dude isn't going to be cheap. But you have to ask yourself, how much is a new truck or just another one?

In this case, whatever you spend fixing it will be far cheaper than a new truck. The prices I have seen lately blow my mind. No way is a pickup truck worth 50, 60, 70, 80 thousand clams. That's insane.

If you want to be a payment slave for eternity, I guess you could go that route. Personally, I have better things to do with my money then to be a slave to the banker crowd.

Those of you that chose that route, you have my condolences. The nose bleed prices these companies charge is because you, the consumer, keep buying them for that amount. Sanity will return to prices when you stop doing that.

That is called the price rationing factor of the supply and demand quotient, and they either lower prices or go out of business- IF YOU STOP BUYING THEM FOR THAT AMOUNT.

I read a recent news release of a fully loaded F350 going for close to the 100K amount. WTF? Do we look like we own oil wells or something? :doh::pointlaugh:

Sorry for the rant, but that topic just chaps my 6.
 
Last edited:

Dave_Nevada

New member
Joined
Dec 13, 2017
Messages
125
Reaction score
0
Location
Reno, NV
Yep, the oilite bearings wear out just like anything. That's exactly why I put one in. They wear, NOT the input shaft.

I have worked on my fair share of toploaders and it's darned rare to see a bad input shaft. Why? Oilite pilot bearing.

The #1 failure in ZF6's is due to that )(!@*#$&$(@# needle pilot bearing. The second is most common cause if the hydraulic clutch system. That system and its 'one size fits all' mentality is just maddening.

The ZF6 is a good transmission if you maintain it, and don't try to destroy it with overloads of high torque from the engine. If someone needs to pump their engine up way beyond what it was designed for, maybe they need to get a race car hobby to teach their wallet a lesson or two. HAHAHAHA :pullover::popcorn:

Why do you think I have an old skool 65 Ford Galaxie with a 427 side-oiler for a hobby? NEED FOR SPEED. But that topic is for another forum. :thumbup:
 
Last edited:

Dave_Nevada

New member
Joined
Dec 13, 2017
Messages
125
Reaction score
0
Location
Reno, NV
Very detailed writeup!
Couple of trans shops around me won't even touch these, so props for the details!
I've been using oillite bushings for the pilot for several thousand miles now.
They do wear out, but at least the input shaft doesn't get destroyed. And, they are easily machined to fit the repair sleeve, if you shaft is beyond its service life.

If they won't touch the ZF6 it's because it's a time consuming HO, which means money, which means profit. The prices I see charged on-line 2K+ are actually pretty decent for what goes into and R&R.

I kept track of all expenses and time consumed, methods, tools required to fix, etc. 2K is a bargain. Anyone charging less is just fooling themselves or they have hidden costs they spring on you later. Things like- "If the main case or rear case is cracked that'll be another ____<--fill in the blank.

Also, DO NOT ACCEPT a rebuilt trans if you see that GD sleeve modification installed. That means the rebuild is sub-standard and you are about to get ripped off. Any trans shop worth their salt replaces the damaged input shaft with a new one.

Main cases with cracks in them is something they will charge you for on your core. MOST 7.3's have them, it's just a matter of where and how bad are they?

Obviously if it's a long runner crack, you're in deep doo-doo with your core. That was me. :fustrate:

BTW- You can stop a crack if you find the end by using an old glazier's glass trick, drill a hole at the end of the crack. Depending on where it's at, it won't hurt a thing. Just a dab of silicone seals it and you're good.

That said, I'm on the West coast. It just made more sense for me to rebuild the trans than to go through the risk of getting another trans with its own unique set of problems.

One last thing. Employing a 'Kevlar' pilot bearing is just ______. <--- You fill in the 'expletive deletive'.

You go from one that runs out of lube and acts like a metal lathe to another that won't hold up to long term wear. <sigh> :popcorn: Okay, getting rid of plastic should be your #1 goal in the entire clutching system.

Plastic is nice for Tupperware, model airplanes, tooth brushes, blah blah blah.

As a pilot bearing? :drool:

Surely you jest Sir. LOL

To equivocate the performance of Kevlar (the load physics of stopping bullet penetration) to the physics of heat generated by torsional force friction of the input shaft is apples and oranges. It's what we call a non-sequitur (a Non-starter).
 
Last edited:

euroford

Member
Joined
Oct 24, 2014
Messages
58
Reaction score
0
fun stuff huh? i'm currently rebuilding my ZF6 as well. Recent road trip driving 287 between CO and TX, while performing a lot of high speed passing maneuvers I roasted 6th gear. These things are surprisingly straightforward to work on once you get your head wrapped around it.
 

Dave_Nevada

New member
Joined
Dec 13, 2017
Messages
125
Reaction score
0
Location
Reno, NV
fun stuff huh? i'm currently rebuilding my ZF6 as well. Recent road trip driving 287 between CO and TX, while performing a lot of high speed passing maneuvers I roasted 6th gear. These things are surprisingly straightforward to work on once you get your head wrapped around it.

Yes they are! Once you get one of these down, no other manual trans should ever bother you. The biggest challenge is to take your time, read, and really examine the gear sets and how it's put together. I have a half a dozen Toploaders I'm eyeballing for a rebuild I was avoiding. They are EASY by comparison.

Since you're doing your's, let me know if you have any questions. I can steer you clear of a few things I saw as trouble areas. I made some of my own tools, and one method of gear removal I used a steel tube and a press rather than using pulling legs against that Intermediate housing. To me, that's just nuts how the manual says to do it. Send me a PM and I'll send you my manual with my notes. I also have tons of pics each step of the way, so if you get stuck, holler.

You have a 2WD or 4WD?
 

Dave_Nevada

New member
Joined
Dec 13, 2017
Messages
125
Reaction score
0
Location
Reno, NV
Okay folks, I engineered those crappy nylon bearings right out of my pedal tree. I am now PLASTIC FREE. :naughty:

Wow, that felt good. Almost like some sort of weirdo 12 step program.

"Hi, My name is Dave. I haven't used any plastic in my pedal tree for 24 hours."
(clap clap clap whistle).:blitzed: :hammer:

Anyway- if you too want to fix your schitt- here's a list of what to grab.

1- 1/2"x 7" diameter bolt; center section of bolt should be thread-less (smooth) for 4.375"
1- 1/2" Nylock nut
3 - 1/2" smooth washers
2- 3/4" ID x1 x1 steel spacers (Hillman 880423, got all the stuff - steel spacers, bronze bearings, etc at Lowes)
4 - 1/2" ID x 3/4 OD flange bronze bearings

Tools you'll need:
3/4" drill bit
Drill press
Bench vice or large C clamp
Sawzall (or a Mexican hack saw- Man-u-al)

Remove the pedal from the pedal tree.
Cut 15.75 mm (.580") off each end of the pedal tube
Drill out the cross shaft hole to 3/4 on each mounting ear
With your vice, press in the bronze bearings on each ear (flange goes to the outside)
Press in the other two bronze bearings into the steel spacers
Press the steel spacers onto the pedal shaft tube
Get your cross shaft bolt and slide a washer on it and run it into the first bearing, mount another washer on the shaft.
Slide the pedal into the tree, keep sliding the bolt all the way to the other side.
Slide a washer on the bolt, then the nylock nut.
Tighten until it just hits the aluminum ear. DO NOT OVER TIGHTEN. Cut the excess bolt (overhang) off.

The cross bolt isn't going anywhere, it's just an axle.

Check for fit. Look good?
Remove the cross bolt and stuff some axle grease on the bearing holes, and coat the shaft.
Re-install the bolt and snug the nylock nut.

While you're into this thing, why not get rid of that silly master cylinder rod stud/plastic keeper and install a heim joint?
Heim= 3/8 bore, 24TPI will do the trick.
Cut that stud and loop off, knock out the plug, stick a bolt in there. Thread the shaft 3/8 x 24tpi.
Throw a jam nut on it for good measure and locktite it with blue locktite.
 

Attachments

  • IMG_0688.JPG
    IMG_0688.JPG
    1 MB · Views: 104
  • IMG_0687.JPG
    IMG_0687.JPG
    1.1 MB · Views: 98
  • IMG_0676.jpg
    IMG_0676.jpg
    725.2 KB · Views: 105
  • IMG_0673.JPG
    IMG_0673.JPG
    1.5 MB · Views: 92
  • IMG_0680.JPG
    IMG_0680.JPG
    1.3 MB · Views: 97
Last edited:

Barnbuilder

Member
Joined
Oct 18, 2011
Messages
379
Reaction score
0
Location
Waxhaw, NC
I'm thinking mine is trans as it's making some rattling noise. Brand new rear end 2 years ago. South bend clutch with 70k miles and the Kevlar bushing. Finishing up a job tomorrow so I'll get under her later in the week.
 

Dave_Nevada

New member
Joined
Dec 13, 2017
Messages
125
Reaction score
0
Location
Reno, NV
I'm thinking mine is trans as it's making some rattling noise. Brand new rear end 2 years ago. South bend clutch with 70k miles and the Kevlar bushing. Finishing up a job tomorrow so I'll get under her later in the week.

First thing I'd plan on doing is getting rid of that kevlar bearing. Stick the oilite bearing in there.
 

ja_cain

Active member
Joined
Aug 10, 2013
Messages
4,597
Reaction score
2
Awesome thread! Thanks a lot for sharing all that info! Those look like some well thought out mods on the clutch pedal assembly and I may try and implement them.

Btw, what was your MOS when you were in the Marines? Alway nice to see a fellow leatherneck posting here. Semper fi!

Justin

Sent from my SM-G930V using Tapatalk
 
Last edited:

Dave_Nevada

New member
Joined
Dec 13, 2017
Messages
125
Reaction score
0
Location
Reno, NV
Awesome thread! Thanks a lot for sharing all that info! Those look like some well thought out mods on the clutch pedal assembly and I may try and implement them.

Btw, what was your MOS when you were in the Marines? Alway nice to see a fellow leatherneck posting here. Semper fi!

Justin

Sent from my SM-G930V using Tapatalk

Hi Justin,

2841- Ground Radio Repairman.
SGT
1975-1980
Nothing special, just a typical Jarhead, I have a PHD (Piled Higher and Deeper) in BS, can spread horse-hockey like a tracked farm implement, I didn't kill anyone, can't fly faster than the speed of sound, nor can I leap over fat broads in a single bound. :pointlaugh:

I had fun, was miserable, bored out of my mind, scared out of my wits- you know the drill.

How about you?

SF,

Dave

Photos are of my M35A2 (a real Diesel truck) that I promptly hand painted with a roller and brush (just like the in the field) a nice Marine Corps green #23, and stenciled 11th MT BN logos in the appropriate places. I never understood a camo paint job on a beast this size, it's like hiding a wart on the end of your nose with makeup. Absolutely EVERYONE knows it's there.:naughty:
 

Attachments

  • Bodo_Daisy_approved_MamaDeuce.jpg
    Bodo_Daisy_approved_MamaDeuce.jpg
    1.1 MB · Views: 73
  • mama_deuce.JPG
    mama_deuce.JPG
    56.7 KB · Views: 73
Last edited:

Dave_Nevada

New member
Joined
Dec 13, 2017
Messages
125
Reaction score
0
Location
Reno, NV
O'Tooles Law: Murphy was an 'Optomist'.

Okay, one problem with the size of the Heim joint I used to mod my pedal tree, the )(!*@$#_()!&*$()*$ POS will not fit in the end of the clutch switch.

"It's toooooo big, it won't fit there".

What? You've never heard that before?

Bummer dude. Seriously, that's too bad.

Anyway- since I have always HATED that dang clutch BS, kill the switch!!!!

Sooo, it's Clutch Switch elimination time, but retaining the Cruise control ‘break’ switch.

Again, some folks like myself absolutely HATE the fact that you MUST depress the clutch to start the engine. :bs:

What the hell? Are we morons to these people? :morons:

Who starts their truck in gear? LOL

Nonetheless, I happen to use the cruise control on long road trips and I do not want to lose the ‘break cruise’ function of the clutch when I decide to down shift. That’s pretty handy.

Therefore, the associated circuits are as follows with my 99 F350 clutch pedal safety switch:

Pins 1 & 2 Starter Relay Control Normally/Open (N/O)
Pins 3 & 4 Cruise Control ‘Break’ circuit- Normally/Closed (N/C)
Pins 5 & 6 No Connection* on Diesels

*If there are wires present on wiring loom in pins 5 & 6, those are only used for a PCM signal on gas engines.

How the OEM switch works for Diesel applications

Clutch pedal in home position
A. Cruise control circuit portion feeds +12 volts dc to the PCM and breaks the +12vdc when the pedal is moved 1/2” down.

B. The starter circuit control is inactive at home position, active when clutch pedal is depressed (sufficiently).

The problem- these switches are really cheaply made. In layman’s terms: they suck and they’re expensive. $48 is an average price. Yeezussss!!! :cursing:

If they break (and they will, see O'Toole's law), you are stuck until you wire pins 1 & 2 together to start the engine. That means cranking your head up into the dash area, trying to get your mitts up in that tight area, aching back, lots of cussing, etc. Not to mention how late you are for work, appointments, wife yelling hurry up, blah blah blah. Who needs that crap?

To remove this troublesome switch, shunt the wires that feed pins 1 & 2.

REMOVE YOUR BATTERY CONNECTIONS and simply cut the plug off, solder and insulate the wires that fed pins 1 & 2. Look at the switch pins; you will see the pin numbers inside the connector receptacle. BTW- those of you that want to install a manual anti-theft switch, use these two leads to feed a hidden toggle switch.

If you don’t have a Clutch switch to look at- here’s the line up:

Switch number: F57B-11A152-AA
Plug key notch is located at 6 o’clock (for reference); pins are numbered starting from left to right.

1 2 3 4 5 6


1 +12 vdc - Starter Relay control circuit
2 Output to the Starter Relay control circuit
3 +12 vdc- Cruise Control circuit
4 Output to the Cruise Control circuit
5 Not used
6 Not used

This means when you start your truck- be in neutral (you should already do this) because the clutch will no longer prevent you from starting it in gear. I know that’s obvious to most, but trust me, there are some that just don’t get it. I call them ‘special’. So did Sir Francis Galton, but that’s another topic hours long in scope. I own a Deuce and a half, and that's exactly how I start it- as well as the dozens of other manual trans trucks I have owned over the years. No biggie.

To restore your cruise control, install a fabricated brake bracket on the pedal tree with a Normally/Closed (N/C) switch on the bracket that is always activated from the clutch pedal home position. Use the two torex screws on the pedal tree to mount the bracket. Easy peasey.

Same idea as how an old style brake switch is designed, except the opposite switch logic; brake light switches are Normally/Open and when active, closed when the pedal is depressed to operate the brake lights. Cruise control on the Diesel truck is always active until the clutch pedal is depressed. Therefore, install a Normally/Closed (N/C) switch.

Lastly, adjust the switch plunger to disengage the circuit at 1/2” of clutch pedal travel.

Film at 11.
 
Last edited:

euroford

Member
Joined
Oct 24, 2014
Messages
58
Reaction score
0
Yes they are! Once you get one of these down, no other manual trans should ever bother you. The biggest challenge is to take your time, read, and really examine the gear sets and how it's put together. I have a half a dozen Toploaders I'm eyeballing for a rebuild I was avoiding. They are EASY by comparison.

Since you're doing your's, let me know if you have any questions. I can steer you clear of a few things I saw as trouble areas. I made some of my own tools, and one method of gear removal I used a steel tube and a press rather than using pulling legs against that Intermediate housing. To me, that's just nuts how the manual says to do it. Send me a PM and I'll send you my manual with my notes. I also have tons of pics each step of the way, so if you get stuck, holler.

You have a 2WD or 4WD?

Thanks man, i'll shoot you a PM, but I think i'm pretty good to go. Since i'm only replacing the 6th gear assembly, my disassembly was minimal and only entailed the 1/R and 6th. Gears were pulled off using a cobbled together assembly of both the 6" and 8" Harbor Freight gear pullers, so it was nice to accomplish this for about $15. Not being able to get behind the 6th gear hub to pull off the roller bearing race, i just cut about a 3rd of the way through the race with a die grinder and cut off wheel and then popped it once with a small chisel. easy! replacement race is only 11 bucks.

Parts are on the way, though i doubt i'll have time for reassembly until after the new year. I haven't entirely figured out re-assembly yet, since I don't have access to a press i'm thinking this will involve warming parts in the oven, finding the right sized pipe and then hammering the **** out of it with a deadblow.

in the meantime i've been seriously occupied with cleanup duty. long story short, 6th gear failure was due to loss of fluid.... so yeah.... very messy.

wrapped up cleanup yesterday and decided to take on another project. I have an under dash gauge pod that holds my fuel pressure gauge, hydra tuner switch and turbosmart boost controller. I always found it very annoying that when shifting into 1st and 3rd the shift lever would clack off the fuel pressure gauge since the rubber bushing in the shift level allows the lever to flex.

since i've never had a vehicle with any kind of rubber flex joint in the shift lever i've decided to eliminate this by welding in a solid steel tube. Though I might catch more vibration through the shift lever, this will allow plenty of clearance to my dash and i figure also a much more positive shift feel.

anybody else tried this out?
 

79jasper

Active member
Joined
Feb 2, 2012
Messages
2,685
Reaction score
4
Location
skiatook, Oklahoma
Ive thought about building my own shifter. Likely leave out the isolator as well.
On mine, the clutch switch isn't on the shaft. I have the starter circuit jumped. My cruise still kicks off if I push the clutch. Engine doesn't go rev happy either.

Sent from my SM-G892A using Tapatalk
 
Top