You are using an out of date browser. It may not display this or other websites correctly.
You should upgrade or use an alternative browser.
You should upgrade or use an alternative browser.
2014 Sema project
- Thread starter jordan572
- Start date
STROKIN N STYLE
Moderator
Been following on IG.. WOW is all I can say!
Awesome work man! You should be proud you built hands down the best truck there. Get better soon so you can enjoy all the hard work!
Ha, that would be cool to have the best truck there but I doubt it. No doubt it is nice, but sema has some crazy stuff.
STROKIN N STYLE
Moderator
Ha, that would be cool to have the best truck there but I doubt it. No doubt it is nice, but sema has some crazy stuff.
Don't be so modest. I followed a few SEMA builds, and yours seemed to be the only one that went into as much detail and custom parts. Most of them are just trucks with nice paint and production aftermarket parts thrown at them.
Don't be so modest. I followed a few SEMA builds, and yours seemed to be the only one that went into as much detail and custom parts. Most of them are just trucks with nice paint and production aftermarket parts thrown at them.
Lol, we can't by any means take all the credit for this thing though. Trevor really helped make this truck what it is. Those shocks are everything, and they would have never happened without PMF suspension. I still can't believe we pulled them off, they came in on Monday of this week!
We'll start where we left off, few more of the wheels as the tape work involved was insane!
First they were cleaned and scuffed, then the spoke accents were sprayed red. That cured over night, next we came in and sanded all the overspray down in the barrels of the wheels with 320. Then two of us taped from 9-5 and didn't say a word the whole time. I admit, they are not perfect, but they pass and my expectations are usually pretty high.
After the accents were taped the front hoop of the wheel was also taped off to prevent overspray problems. The back side was sprayed, then the paper was pulled and the front side was sprayed. Pretty crazy, and again the black didn't turn out perfect on the sides of the spokes. Obviously it is very hard to get a nice wet clear coat on the sides of the spokes. To make matters even more difficult these wheels were painted with a flattened clear, that means if you have any hangers your stuck with them. Any dirt, sags or imperfections are there to stay, very unforgiving.
WhiteMamba_Scorpion
New member
- Joined
- Jan 10, 2014
- Messages
- 1,952
- Reaction score
- 0
Wish I was going to SEMA. I hate my life
A few pictures of the H&S Motorsports turbo kit, fitment, layout and the entire package are just insane.


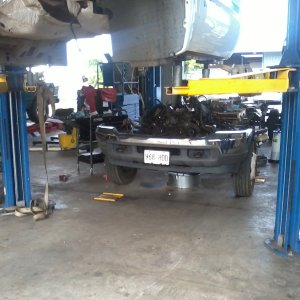
We had some issues with firing the truck up, (not a surprise) the tcm took a crap on us so it wouldn't allow me to communicate with the truck at all. No diagnostic, nothing. Pretty much just any wild guess at this point, I remember hearing a rattle in the tcm when I reinstalled it. I stole the one off a shop truck and boom fired right up. Another guy that builds trucks told me if you leave those attached to the frame when you air hammer the rivets out you wreak them, I'm sure that is what happened.
2 nights ago I believe, I ran it around the lot and noticed insane lag and tons of smoke. Thought about it while we worked through the night and took it out again, sure enough the truck wouldn't shift out of third. The strategy on the replacement tcm didn't match the one that was in it before. We figured this out the day before it was supposed to leave. Luckily I took some pictures of all the labels on the transmission before we painted it, those numbers correspond to the correct strategy. Thanks to Midway ford, they sent over their lead tech with the ids equipment and straightened things out at 8 am right before it left. Just crazy last minute stuff but it worked out!
FordPSD64
Member
this might be one of the most impressive builds i have ever seen. the attention to detail, even the smallest things is just mind blowing. y'all are killing it. this thing is F'N awesome!
kmanxj
New member
X 1,000,000,000,000this might be one of the most impressive builds i have ever seen. the attention to detail, even the smallest things is just mind blowing. y'all are killing it. this thing is F'N awesome!
johnp115
Active member
X 1,000,000,000,000
To the power of 100,000,000,000
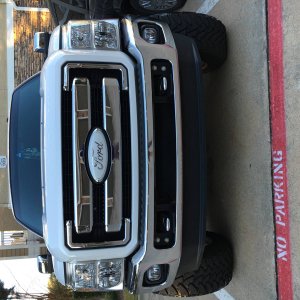
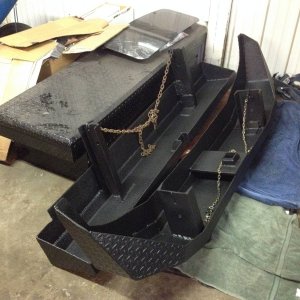
Front bumper weighed a lot after getting the lights installed, two 40'' e2 rigids and two q2 driving lights. All mounting brackets and the back side of the bumper painted black, color matching the rigids really tied things together I think. These lights kind of look like the belong on the truck.


97stoker350
Active member
We need MOAR!!!
dustinz85
Member
Damn.... the awesomeness of this build is infinite....Front bumper weighed a lot after getting the lights installed, two 40'' e2 rigids and two q2 driving lights. All mounting brackets and the back side of the bumper painted black, color matching the rigids really tied things together I think. These lights kind of look like the belong on the truck.


Bottom of box sprayed just like the cab, it works!


Transmission pan turned out pretty cool too,

Along with the oil pan,


Alignment time, also installed the psc assist ram after adjusting the toe,

The horns just barely found a home, I think we used just about every inch of space possible throughout the truck.


We didn't go all out on prepping the brackets or tanks as these are not seen at all unfortunately. They turned out so nice too.

Some of the wiring shots, trying to keep things organized.


Inline filters painted to match :lookaround:,


Who is this guy?

Transmission pan turned out pretty cool too,
Along with the oil pan,
Alignment time, also installed the psc assist ram after adjusting the toe,
The horns just barely found a home, I think we used just about every inch of space possible throughout the truck.
We didn't go all out on prepping the brackets or tanks as these are not seen at all unfortunately. They turned out so nice too.
Some of the wiring shots, trying to keep things organized.
Inline filters painted to match :lookaround:,
Who is this guy?
I definitely will get more when I see the truck again, one of the guys spent some serious time on the brake lines/speed sensor wires going to the axles. You can see on the left upper link arm 3 small tubes. Trevor sent us a small bracket to capture the brake lines and wires going to the rear axles. Originally the brackets were setup to run 4 tubes down one arm and 2 down the other. We put a twist on it and converted the 4 tube bracket to a 3 tube bracket. We found some tubing and welded it directly to the bracket. The outside tubes house the brake fluid lines, the center tube has the speed sensors and the diff locker. On the axle itself hard lines were bent all the way to the caliper with a small flexible line to the caliper. It turned out awesome so I will make sure to get some pictures of it. This is definitely one thing many builds overlook, it kills me when people spend a ton of time on painting or powder coating their axles to just throw the lines back on.

97stoker350
Active member
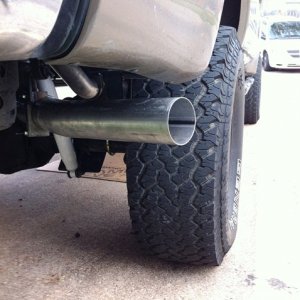
Is there enough room for the tire with the exhaust where it is? Looms like it might be close
This thing is a work of art also, Trevor and myself worked together to lay this thing out. Trevor laser cut all the mounting holes for the compressor isolators that I stole off the accuair exo mounts. Also, the mounting holes for the air valve assembly, ecu and the wifi module were all cut into the mount. A total of 4 compressors, all the accuair stuff and the fass fuel pump were mounted to this plate believe it or not. One of the guys spent half a night at least welding the mounting tabs on, they had to be near perfect to work correctly. We used some of the subframe bolts and drilled a few more in the top side of the frame with a 90 degree drill. This was all done cab on, you all know the time schedule we were under, there was no time to leave the cab off. Man it sucked tightening the bolts/nuts and running the air/fuel lines behind the plate but it worked. And does it look awesome!


The stainless hoses have been covered since this picture, don't worry


The stainless hoses have been covered since this picture, don't worry
Taylor D
New member
This just gets better and better awesome job