Forums
New posts
Search forums
What's new
New posts
New media
New media comments
New profile posts
Latest activity
New showcase items
New showcase comments
Media
New media
New comments
Search media
Members
Current visitors
New profile posts
Search profile posts
Showcase
New items
New comments
Latest content
Latest reviews
Latest updates
Search showcase
Log in
Register
What's new
Search
Search
Search titles only
By:
New posts
Search forums
Menu
Log in
Register
Install the app
Install
Forums
Power Strokes
6.4 Aftermarket
6.4 headstud torque?
JavaScript is disabled. For a better experience, please enable JavaScript in your browser before proceeding.
You are using an out of date browser. It may not display this or other websites correctly.
You should upgrade or use an
alternative browser
.
Reply to thread
Message
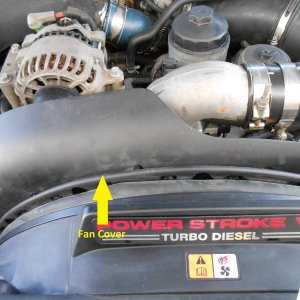
[QUOTE="powerstroked08, post: 1143123, member: 8135"] Here is how I did my studs one at a time. And for the record this isn't what most would reccomend BUT I have over 30K miles with them in with no issues. I know I'm probably missing some stuff but this is the jist of it. Head studs Before attempting to do my studs i bought about 3-16mm impact sockets(kobalt) just in case as well as 4-13/16 12 point sockets (craftsman) only because i have heard of so many people breaking them. I would also suggest locating a torque wrench that goes to 275ft/lbs (as dumb as it sounds i had a hard time finding one, all of the 1/2" drive ones i found only went to 250ft/lbs so i had to use a 3/4" for my final torque) and if you have a 3/4 drive make sure you buy a decent adapter to go to 1/2 drive unless obviously you have a 13/16 12 point 3/4" drive. First i disconnected the batteries and drained the coolant(i put a hose on the drain so it didn’t make such a mess) then removed the driver side battery and reservoir along with both inner fenders. On the driver side i also removed the one Y coolant line that connects to the timing cover 2-8mm bolts. I then removed the air box and intake tube going to the turbo. Then i unbolted the oil fill reservoir 4-8mm bolts. Next i disconnected the heater hose from the plastic line on the top of the valve cover. Be careful with this because its easy to break, this plastic line will be somewhat of a nuisance when torqueing the studs down later. Then disconnect the glow plug harness at the front of the valve cover and remove the glow plug connectors. Be sure not to pull on the wires when unplugging the glow plugs. I popped the rubber grommets out of the valve cover a little bit and then pinched the T connector and gently wiggled and it seemed to work pretty easy. Now finish up disconnecting the rest of the wiring on the valve cover there are 2 connectors on the glow plug control box on the back half of it and one small one for your egt sensor as well as one last connector on the fire wall above the A/C accumulator. Next thing to do is unbolt the A/C accumulator 2-10mm nuts. Now there is one bolt to remove from the heat shield under the turbo and then pry up the shield to remove the bolt that holds the bracket to the valve cover 4-8mm. Now you should be ready to remove the valve cover 10-12mm bolts.(the bolts don’t come out of the valve cover so you don’t need to mark where the studs and bolts go) Now you should have access to the head bolts.I had a 3" and a 6" 1/2" drive extension on hand and a standard 16mm 6 point impact socket. Some of the bolts you can get with an impact gun but the rest i used a 1/2" breaker bar and a 3 foot cheater bar. Obviously be extremely careful breaking these bolts loose because there isn’t a lot of clearance near your injectors. I removed the bolts in the same order as the arp torque sequence and then installed the stud and used a 3/16 Allen wrench to hand tighten the studs in the block.( i prepped all of the studs with a light coat of oil on the coarse block side threads and then the moly lube on the fine head side threads of the studs and i also put moly on both sides of the washers and on the nuts) take your time tightening the stud with the allen wrench because there is oil in the bolt holes and it can give you a false sense of being tight. Then i tightened the nut to the first torque torque setting 90ft/lbs ( remember to be careful to not break the heater line on the passenger side head)then i loosened it up and retorqued again to 90ft/lbs and then torqued to the second torque setting 175ft/lbs. For the back bolts i had to jack the back of the motor up( i had the transmission out already so you can probably loosen the transmission mount and jack up the back of the transmission) And to torque the back bolts down especially the passenger side back lower stud i moved the A/C accumulator and torqued it through the inner fender its tight but it seemed to work for my truck. Once i had all of the studs in i went and did my final torque 250ft/lbs(225 in the weak holes) in the recommended order. Now the worst one i had to do was the back lower passenger side, and like i said i did that one through the inner fender. The one A/C line was in the way for my 3/4 drive torque wrench but i was able to use a regular short socket and slide the wrench under the line and do my torque. Now your done! [/QUOTE]
Insert quotes…
Verification
Post reply
Random media
Latest posts
Do not recommend Choate Engineering
Latest: DEEZUZ
Yesterday at 10:22 PM
Newly Enlisted
A few turbo questions and a rant
Latest: ghohouston
Yesterday at 9:41 PM
7.3 Aftermarket
Truck slipping into 4th
Latest: Powerstroke Cowboy
Yesterday at 9:26 PM
6.7 Tech
O
2011-2016 Radiator upgrade
Latest: OtisCreekConstruction
Yesterday at 6:17 PM
6.7 Tech
Performance shops
Latest: DEEZUZ
Tuesday at 8:42 AM
7.3 Performance
Members online
No members online now.
Forums
Power Strokes
6.4 Aftermarket
6.4 headstud torque?
Top