2014 Sema project

jordan572

New member
Joined
Mar 17, 2013
Messages
487
Reaction score
1
Onto one of my better ideas so far, the rear diff. We'll be installing the rear truss and upper link mounts soon so I needed to get everything cleaned up that is under the truss. I ground all the rough casting surfaces for hours until I got as much as I could. Not quite all of it but at least 90%, cast is some dirty black stuff. It was looking pretty good, after that we rolled it into one of the booths and sprayed it with a high build sealer. Again I spent another couple hours sanding the sealer down, first with 220 then 320. I got it very close again but not perfect, we'll have to grind off the sealer where we need to weld the truss to so it will need more prep work anyway. I really hope all that work will be worth it, it took forever.

IMG_2230.jpg

IMG_2231.jpg

IMG_2233.jpg

IMG_2235.jpg

IMG_2237.jpg

IMG_2238.jpg

IMG_2239.jpg

IMG_2240.jpg

IMG_2384.jpg

IMG_2383.jpg

IMG_2550.jpg

IMG_2549.jpg

IMG_2553.jpg

IMG_2556.jpg


I ended up going back again and tried my best to get into the corners some more, I have issues.
 

jordan572

New member
Joined
Mar 17, 2013
Messages
487
Reaction score
1
I HATE the man step built into the back tailgate, cap never fits, weighs a ton and just overall makes the back tailgate a mess to sit on cause you know I'll be sitting on the tailgate all the time :thumbsup:. We deleted that thing, I pulled all the step guts out and got a base model tailgate cap from ford. Fits great, only issue is that there is no support in the middle of the gate. We could have left it but thats hoaky so we sectioned in a piece to give it some integrity there. Just waiting to paint it real quick,

IMG_2211.jpg

IMG_2213.jpg

IMG_2216.jpg
 

01pwrstkr

New member
Joined
Feb 4, 2014
Messages
4,918
Reaction score
1
Location
Polk County NC
Man every time you post i just can't believe it! The detail and thought going in to this build is mind blowing! Love it!

sent from my little slice of heaven (the bathroom)
 

jordan572

New member
Joined
Mar 17, 2013
Messages
487
Reaction score
1
I moved back to the frame to give that thing a little bit of attention, I believe we have all the supply/return lines figured out so I ripped those out. We plan to run just some parker rubber hose for all the lines. Stainless braided lines are okay, personally I don't see a place for them on this build however. I also cut off all the pigtails that won't be getting used on the frame, there was so many. 4 EGT pigtails, 3 dpf, 1 urea injector, nox module, lpfp power, wif sensor and a few random plugs that were capped from the factory. I got some closed shrink wrap resin caps from waytek wire, they got me for something like .45 cents a piece for those things :bs:. Anyway, many hours later all wires were capped, wrapped with electrical tape like oe with new wire loom in place. Hard to even notice where all those plugs once were.

IMG_2324.jpg

IMG_2338.jpg

IMG_2340.jpg

IMG_2341.jpg

IMG_2342.jpg

IMG_2346.jpg

IMG_2351.jpg

IMG_2352.jpg

IMG_2448.jpg

IMG_2444.jpg

IMG_2445.jpg

IMG_2446.jpg

IMG_2447.jpg
 

earv_g0tti

New member
Joined
Aug 18, 2014
Messages
221
Reaction score
0
yay lights!!!

sick truck, but man i woulda loved to have that step gate haha
 
Last edited:

jordan572

New member
Joined
Mar 17, 2013
Messages
487
Reaction score
1
Wow tons of progress since the last time I checked in here
Awesome work!

Thanks!

yay lights!!!

sick truck, but man i woulda loved to have that step gate haha

Ha, I need the platinum tailgate though, no trades!

Just tuned in and read this whole thing. This truck is awesome! Everything so far is perfect and not too over the top. Love it!

Thank you, thats what were hoping for, I'll definitely be pushing the over done look with the double light bars. However, a good mount setup and them being 54'' bars that stretch the entire width of the windshield should make them look clean I hope.

Jordan you are a nut! I love it

Haha, I'd say your pretty much there yourself.

With the ADD attention to detail......it might have been post, but I missed it, but there has to be something special planned for the frame

Frame will be sprayed Ruby Red, :fustrate:.
 

jordan572

New member
Joined
Mar 17, 2013
Messages
487
Reaction score
1
Headlamp time, finally got these things all buttoned up. What a project, these things fought me the entire way through. I was nervous about taking this task on myself as almost always people pay a professional to do their headlamps. I worry about the paint quality and just the overall work of many of these companies. There is no money in doing them the way I did I doubt. In previous post I've showed a little bit of the headlamp building. Anyway pretty much cooked em, ripped them open and broke them down. I fit the bottom d2s 3.0 projector into the bottom bowl. I then reassembled the headlamps and installed them into a relatives truck. I aimed them to make sure the step in the cutoff was correct, the horizontal aim was level and the vertical aim was similar between the two lamps. I ended up pulling one back apart and sanding/fitting the projector again so when the headlamp adjusters are adjusted at the same amount both the headlamps vertical aim is the same or very close. This was a little excessive but I think it is the best way. Sure the adjusters can get the vertical aim correct between the two lamps but one bucket might be tilted toward the sky while the other at the ground. That stuff bothers me, enough to spend 3-4 more hours messing around with the aim, :fustrate:.

Everything was fitted so it was time to paint the parts, black lower bucket, black upper flasher bucket and a black reflector. The rest went ruby red including the rigid d2s and the apollo 2.0 shrouds.

IMG_2227.jpg

IMG_2228.jpg

IMG_2229.jpg

IMG_2243.jpg

IMG_2245.jpg

IMG_2248.jpg

IMG_2250.jpg

IMG_2274.jpg


Inside of the shroud sprayed flat black to prevent light glare from light leakage off the projector. The little things,

IMG_2159.jpg


First part was to wire up the Rigids to have an integrated flasher, I used some amber/red leds bulk strip from oracle. Test fit them, cut the spool, solder and shrink wrapped the wires. I used an existing hole on the rigid housing to wire in the led strip. I had to drill out the hole to run my wiring through but it looked mint all said and done.

IMG_2308.jpg

IMG_2309.jpg

IMG_2313.jpg

IMG_2315.jpg

IMG_2318.jpg

IMG_2316.jpg

IMG_2326.jpg


I love it!
IMG_2327.jpg
 

jordan572

New member
Joined
Mar 17, 2013
Messages
487
Reaction score
1
Okay, the final assembly. Fitted the Rigids, aimmed a million times tightened and retighten multiple times and thread locked all screws, nuts and bolts. I pray that everything stays where its suppose to. I installed the projector and clocked it right to the marks that I put in the bowl when I aimed them in a relatives truck. The horizontal aim should be very close, Rigids were all in and the side reflector was back in. Put just a dot of super glue on the back side of that to hold it incase that thing wants to come unclipped. I also tightened down the projector body nut with a pair of pliers and jb welded the nut and body to the bowl in hopes that the projector never comes loose. Finally after cleaning and cleaning, dusting with keyboard duster then checking with a bright white led flashlight I got them as clean as I could. Screwed the headlamp surround to the lens and started on the wiring.

IMG_2595.jpg

IMG_2582.jpg

IMG_2596.jpg


I have it wired so the factory high beam control will trigger on the rigids and lift the cutoff up in the projector. I also have it setup so the turn signals will flash the amber backlighting in the rigids. All with three wires, and a y Deutsch harness I made for the rigids. Took me a long time to figure out what I thought was the best way to wire these things up,

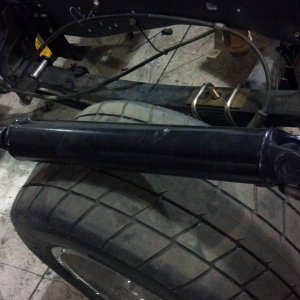
Wire harness in progress,
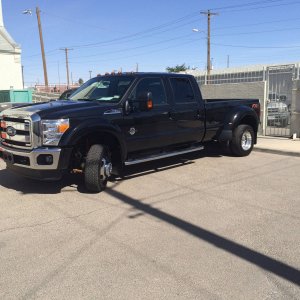
IMG_2600.jpg


Final product,
IMG_2601.jpg


High beam projector trigger splitting off top left, rigid y splitter on the right and the small wire zip tied to the deutsch connector is the backlighting in the rigids for the flashers. I got some straight style d2s plugs for the projector bulb. Those orange 90 connectors are garbage to try to seal around so I cut, and soldered in the new ends.

IMG_2579.jpg


These make sealing so clean and easy, I ran the three wire for the rigids and turn signals out of the running light socket. There wasn't enough clearance to run them out of the flasher socket. I had to dremel and drill out that little socket to run the three wires out. I really like how the backside turned out, although nobody will see it I'm not a fan of using aluminum tape and a bunch of silicone.

IMG_2598.jpg

IMG_2599.jpg


That was about 10 hours of work, fitting, cleaning and wiring these things was unbelievable. And the complete lamp!,

IMG_2602.jpg

IMG_2604.jpg

IMG_2605.jpg

IMG_2606.jpg

IMG_2621.jpg

IMG_2620.jpg
 

Latest posts

Members online

No members online now.
Top