2014 Sema project

Joined
Mar 7, 2014
Messages
628
Reaction score
0
Location
Central Illinois
That is one of the best looking custom painted interiors I have ever seen! Great choices on what to paint and what not to. Perfect amount of trim pieces painted and definitely a great factory look. Awesome job!
 

Twinturbostroker

New member
Joined
Apr 9, 2012
Messages
2,556
Reaction score
0
Location
El Paso, Tx
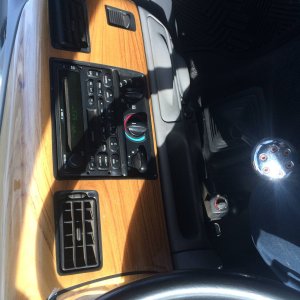
I got most of the interior back together the other day, overall it looks real nice in person. With all the door shut and the windows wrapped up the lighting is a little bit poor, anyway.


IMG_2174.jpg


I love how these little chrome door handle trim caps turned out, they gave a good fight. I'm glad I did them though,
IMG_2257.jpg


Man truck is looking amazing.....but I gotta be honest, and only since you are going balls to the wall with this thing......the vents need something, not sure if its paint or some kind of accent, but something, just like how you accented the door handles in the pic below....JMO
 

vrog

New member
Joined
Apr 23, 2014
Messages
217
Reaction score
0
looks so good man.
Since we are being super critical of the baddest truck to ever be built. Can you get that vent apart? If you painted that honeycomb looking part red behind the vent blades it might give it some "pop"
 

Twinturbostroker

New member
Joined
Apr 9, 2012
Messages
2,556
Reaction score
0
Location
El Paso, Tx
looks so good man.
Since we are being super critical of the baddest truck to ever be built. Can you get that vent apart? If you painted that honeycomb looking part red behind the vent blades it might give it some "pop"

There you go, that might do it.....
 

johnp115

Active member
Joined
Feb 1, 2013
Messages
2,211
Reaction score
0
Location
Southern MD/Charlotte NC
looks so good man.
Since we are being super critical of the baddest truck to ever be built. Can you get that vent apart? If you painted that honeycomb looking part red behind the vent blades it might give it some "pop"


There you go, that might do it.....

Yeah that would be pretty cool imo but if not done it still looks amazing, looks factory which is good.
 

jordan572

New member
Joined
Mar 17, 2013
Messages
487
Reaction score
1
Ha, glad to see everyone so into the vents, I chose black for a few reasons. Main reason was to cut down on the red, second was black blended a lot better with the factory gray it was. The back side of the fins did for the most part get covered black but not nearly as complete as the tops that are easily visible. The vent doors obviously open and close and also rotate, putting too much paint on these I figured would make them bind and potentially chip as you can only prep these so well. As for painting the honeycomb, idk maybe its just me but I don't think thats a hot look. The honey comb is very thin, somewhat unfinished and just not that appealing to me so I thought it was best just to leave them be. Plus less work, :clapping:. Ha
 

rhygunnar

New member
Joined
Aug 3, 2014
Messages
76
Reaction score
0
Location
San Antonio, Texas
Ha, glad to see everyone so into the vents, I chose black for a few reasons. Main reason was to cut down on the red, second was black blended a lot better with the factory gray it was. The back side of the fins did for the most part get covered black but not nearly as complete as the tops that are easily visible. The vent doors obviously open and close and also rotate, putting too much paint on these I figured would make them bind and potentially chip as you can only prep these so well. As for painting the honeycomb, idk maybe its just me but I don't think thats a hot look. The honey comb is very thin, somewhat unfinished and just not that appealing to me so I thought it was best just to leave them be. Plus less work, :clapping:. Ha

Man i agree. I think if you go doing too much then you cross that "line" i love it the way it is. super jealous.. i plan on doing the piece around my odometer, but i am no where near your level to attempt what you did. id end up with a bunch of broken clips and me drinking staring at my truck with parts on the ground :axe:.. great looking truck man. by far the best attention to detail ive seen on here
 

vrog

New member
Joined
Apr 23, 2014
Messages
217
Reaction score
0
Ha, glad to see everyone so into the vents, I chose black for a few reasons. Main reason was to cut down on the red, second was black blended a lot better with the factory gray it was. The back side of the fins did for the most part get covered black but not nearly as complete as the tops that are easily visible. The vent doors obviously open and close and also rotate, putting too much paint on these I figured would make them bind and potentially chip as you can only prep these so well. As for painting the honeycomb, idk maybe its just me but I don't think thats a hot look. The honey comb is very thin, somewhat unfinished and just not that appealing to me so I thought it was best just to leave them be. Plus less work, :clapping:. Ha

HAHAHAHAHAHA It doesn't matter buddy it looks amazing the way it is.
 

jordan572

New member
Joined
Mar 17, 2013
Messages
487
Reaction score
1
I finished up the center stack today, I actually looked past a few pieces believe it or not during the initial tear down. Unfortunately the chrome on the knobs didn't wan't to come off. I'm not certain that it won't but more harm I felt would happen then good on those. I did get the chrome out around the zone selector and the media button. They looked so mint,

IMG_2270.jpg

IMG_2271.jpg

IMG_2272.jpg
 

jordan572

New member
Joined
Mar 17, 2013
Messages
487
Reaction score
1
I also took advantage of having the interior apart, I mounted the mini maxx up using the H&S pod mount adapter. I really liked how it turned out, few drops of epoxy on the back side for good measure held it tight. Never been a fan of the majority of the dash mounts, they have some nice options out there but this turned out really clean. Little scary hitting the instrument cluster trim piece with the big hole saw but as you can probably tell there is no time to be scared here, lol.

IMG_2168.jpg

IMG_2171.jpg

IMG_2172.jpg
 

jordan572

New member
Joined
Mar 17, 2013
Messages
487
Reaction score
1
These emblems were killing me, damn painter can't help himself with the paint thickness. Everything just barely fit, so much goofing around in those things to make sure not one part cracks. Pretty stressful, especially when you don't do these custom emblems every day like other places do. Anyway in the spirit of doing as many things as we can ourselves and not subbing every job out possible we nailed em.

IMG_2016.jpg

IMG_2017.jpg

IMG_2018.jpg

IMG_2019.jpg

IMG_2020.jpg

IMG_2025.jpg
 

CAT35niner

New member
Joined
May 19, 2011
Messages
1,312
Reaction score
0
Location
NJ
God everything looks so good. Attention to detail with everything. Can't wait to see it all done.
 

Latest posts

Members online

Top