2014 Sema project

jordan572

New member
Joined
Mar 17, 2013
Messages
487
Reaction score
1
Amazing build man... I just now read the whole thread. Your work is incredible. This may be a random question... But would you consider building me a set of those jackstands? lol

Well there is a price for anything but honestly those took a lot of time to make and paint especially. I think the two were made by Gray manufacturing, we made two more to replicate the other ones.
 

jordan572

New member
Joined
Mar 17, 2013
Messages
487
Reaction score
1
Picture overload is coming here soon, been so busy with the truck I'll try to catch everyone up as best as I can.
 

jordan572

New member
Joined
Mar 17, 2013
Messages
487
Reaction score
1
I'm just going to start dumping photos,


Painted subframe,

IMG_1393.jpg

IMG_1394.jpg

IMG_1395.jpg

IMG_1396.jpg

IMG_1397.jpg

IMG_1398.jpg

IMG_1399.jpg

IMG_1401.jpg

IMG_1402.jpg
 

jordan572

New member
Joined
Mar 17, 2013
Messages
487
Reaction score
1
Axles prepped, sealed, painted, cleared, looking insanely nice.

IMG_3456.jpg

IMG_3445.jpg


Cut off the lower track bar ball joint bracket,

IMG_3454.jpg

IMG_3457.jpg


High build primer,
IMG_3492.jpg

IMG_3493.jpg


All sanded down,
IMG_1349.jpg


I can say all that smoothing with the grinder and sanding of the high build sealer/primer was worth it. The diffs looks wet instead of the rough casted look,

IMG_1405.jpg

IMG_1406.jpg

IMG_1407.jpg

IMG_1408.jpg


IMG_1418.jpg

IMG_1420.jpg

IMG_1422.jpg

IMG_1423.jpg


:eek:wned:

IMG_1432.jpg

IMG_1434.jpg

IMG_1448.jpg

IMG_1449.jpg

IMG_1446.jpg

IMG_1445.jpg


With just one Rigid rock light on it,
IMG_1452.jpg
 

jordan572

New member
Joined
Mar 17, 2013
Messages
487
Reaction score
1
Tail lamp time, we did some nice work on the headlamps I think so the tails have to be the same. These things turned out just insane, proud to say I did all of the headlamp/tail lamp work in house, keep it under one roof. These turned into quite the project also, I am so over the headlamp/tail lamp work for this build but they look amazing.

They started as your normal clear lens recon tail lamp, purchased from the diesel cartel of course,

IMG_2559.jpg


Then I looked for a back up lamp solution as if you can't tell I like lights, I didn't want to use the oracle pods that many retro fitters use, I want bigger and better of course. I purchase some xpod led lights from the retro fit source, I just barely made these work but they are crazy bright for the size and look really cool.

IMG_2646.jpg

IMG_2648.jpg


I unscrewed the machined aluminum cap to aid in installation as the light was far too deep in it's original form. I then busted out the dremel and shaped the lamp to the exact flange on the xpod. That way they have something to lock into when screwed down, and I know both sides are aimed the same way. I drilled a couple screw holes and bolted them in.

IMG_2655.jpg


The face of the light was still just barely hitting the lens, a lot of work with the grinder gave enough clearance for the lens.

IMG_2656.jpg

IMG_2657.jpg


Onto the paint work for the tail lamps,

I decided to paint all of the chrome body red, the red reflectors had to be taped off and sprayed black separately because they were glued in or something.

Yes I taped the back off unlike so many "professional" retrofitters,
IMG_3141.jpg

IMG_3142.jpg


Sprayed red
IMG_3490.jpg


Then taped off for the black,
IMG_3491.jpg


Reassembled with the xpod back up light painted red also!
IMG_1426.jpg


IMG_1428.jpg

IMG_1462.jpg


I then ran into an issue I knew I would come across, when you seal them back up with the butyl and press the lens back on you get a hooptie looking border. As you can see since the lens is clear you can see the bad looking border around the entire light. I was not happy, but nothing more effort can't fix I guess.

IMG_1464.jpg


I taped the lens off again leaving the border exposed,
IMG_1430.jpg


We sprayed the black, pulled the tape and then cleared the entire lens,
IMG_1507.jpg


As you can see there is a small ridge visible between the black outline and the clear, we wet sanded and buffed the ridge so it is as close to perfect as possible.

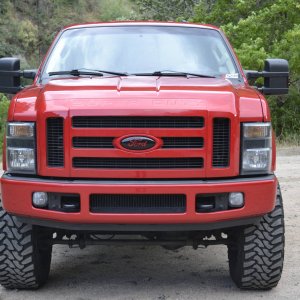
These turned out just great, by no means done by a professional retrofitter but these things are as good as I have seen. Just mint,

IMG_1526.jpg
 

jordan572

New member
Joined
Mar 17, 2013
Messages
487
Reaction score
1
Next up the brakes, the black wilwoods just didn't cut it. I figured they will get lost behind the black wheel. Had our vinyl guy make some black wilwood vinyls the identical size and away we went. The vinyls were all cleared over so they won't peel off.

IMG_3274.jpg

IMG_3273.jpg

IMG_3268-1.jpg

IMG_3267-1.jpg

IMG_3333.jpg

IMG_3342.jpg

IMG_3344.jpg

IMG_3350.jpg
 

01pwrstkr

Active member
Joined
Feb 4, 2014
Messages
4,918
Reaction score
1
Location
Polk County NC
My god!!! It amazes me to no end of the amount of time and patience you put into the slightest of details! Absolutely stunning!!!!

"3 can keep a secret if 2 are dead"
 

gigabit

New member
Joined
Oct 15, 2013
Messages
78
Reaction score
0
Location
Florida
i get excited everytime i see this thread bumped. superb work.


Sent from my iPhone using Tapatalk
 

Hendrys2009

New member
Joined
Oct 1, 2013
Messages
211
Reaction score
0
Location
Baytown, Tx
Jordan have you mounted your recon tails yet? every set I have installed never fit good at all as far as the tailgate gap goes. Are you going to do anything about that?
 

AzPsd55

New member
Joined
Jul 22, 2011
Messages
127
Reaction score
0
Location
Goodyear, AZ
Dam the paint on the axle looks like its about to drip off, and those tail lights are a work of art, your not giving yourself enough credit. Great work can wait to see it all done.
 

Members online

No members online now.
Top