You are using an out of date browser. It may not display this or other websites correctly.
You should upgrade or use an alternative browser.
You should upgrade or use an alternative browser.
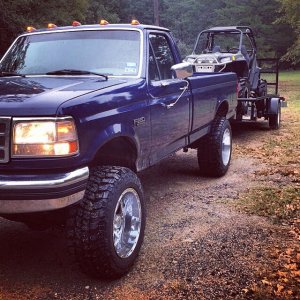
Daily Driver / Tow Pig Build....
- Thread starter mjonesjr
- Start date
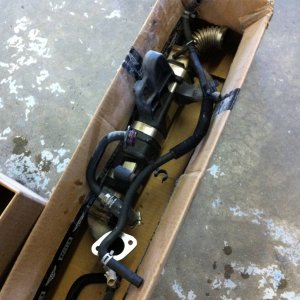
I have been having a little problem with my fuel system the last couple of weeks. It hasn't been wanting start the fuel pump. Saturday morning when I was starting my truck to leave work, the fuel pressure never came up. I popped the hood and flicked the relay in the dark. After flicking the relay, the pressure came up and the pump came on.
Fast forward to today, I decide to check out the problem since I have to drive it to work tomorrow (haven't driven the truck since Saturday morning). Below is what I found.


The relay was no where near a heat source. I think it was just cheap Chinese junk. I put in a Motorcraft relay out of the old fuse/relay box I got and it works like a dream now!
Fast forward to today, I decide to check out the problem since I have to drive it to work tomorrow (haven't driven the truck since Saturday morning). Below is what I found.
The relay was no where near a heat source. I think it was just cheap Chinese junk. I put in a Motorcraft relay out of the old fuse/relay box I got and it works like a dream now!
lincolnlocker
Well-known member
wow that relay almost looks as if it was on fire at one point.... you have that truck looking sweet man.... i just went back and looked at all the posts i have missed... very nice!!
I would bet it was. The cover for the pyrometer gauge wiring is melted a bit and black in one spot. It was about 3" above where the relay was setting.wow that relay almost looks as if it was on fire at one point.... you have that truck looking sweet man.... i just went back and looked at all the posts i have missed... very nice!!
I'm glad it didn't burn down the truck. If it did, I might have had to sue Painless since the relay came in their relay socket kit I bought just for the fuel system wiring.
trinity250
New member
- Joined
- Jul 23, 2011
- Messages
- 29
- Reaction score
- 0
That is crazy with the relay never seen anything like that. Great build BTW had to go back and reread it all.
I had a small water leak in the cab above the windshield. I narrowed it down to one of the cab light gaskets. I ordered new gaskets from the local dealership and installed them. The part number is EOTZ-15A402-A and were $6.17 each after tax. If you are going to change out the gaskets, you will need to order 1 for each light. They are sold individually.
Compared to the old gaskets, I can see why they leaked.


Compared to the old gaskets, I can see why they leaked.
96stacked&smoken
New member
im gona let you work the bugs out of the fuel system then il do it.lol
I scored a Dana 60 from a '94 F-350 this morning for $500. They are going for anywhere from $800-$1500 around here lately.
This one comes with everything to do the swap in my truck, minus the hubs, brake lines, and steering.
Hopefully by this time next week, I will have this bad boy swapped in. I am off until Friday so I have plenty of time.


This one comes with everything to do the swap in my truck, minus the hubs, brake lines, and steering.
Hopefully by this time next week, I will have this bad boy swapped in. I am off until Friday so I have plenty of time.
Got some work done on the axle today. I got the rotors/hubs off so I can get the rotors turned and swap out the bearings.
The track bar bracket and driver side u-bolt plate should be here by Friday. If I get it Friday, I am going to do the swap on Saturday.
I couldn't get the dang spindle off. I beat and beat and heated and beat the dang things and they still wouldn't come off. I need to get a set of torches in and really heat them up. I am going to wait till I get the axle in the truck and do that.

I also got the track bar cleaned up and the new bushings put in.


I got the lower tie rod installed as well. I "think" it is pretty close, but will not know for sure till I get the tires on it under the truck.


All my parts that are left to go in.

I also measured the before ride height of my truck.
Driver Side:

Passenger Side:

More to come tomorrow.
The track bar bracket and driver side u-bolt plate should be here by Friday. If I get it Friday, I am going to do the swap on Saturday.
I couldn't get the dang spindle off. I beat and beat and heated and beat the dang things and they still wouldn't come off. I need to get a set of torches in and really heat them up. I am going to wait till I get the axle in the truck and do that.
I also got the track bar cleaned up and the new bushings put in.
I got the lower tie rod installed as well. I "think" it is pretty close, but will not know for sure till I get the tires on it under the truck.
All my parts that are left to go in.
I also measured the before ride height of my truck.
Driver Side:
Passenger Side:
More to come tomorrow.
I got some more progress done today.
Got the spindles off. AutoZone has a nifty tool that screws on the spindle and a slide hammer that beats the spindle off. As tight as they were on there, there was no other way to get it off. Once they were off, a TON of anti-seize went back before the spindle did. The old dust shields were rotton, so they came off for good. I also got a nice new set of MileMarker Supreme lockouts. With the new bearings installed in the freshly turned rotors, the hubs/rotors, and lockouts got installed. I also got the track bar bracket straightened.


I also got the center section cleaned out, diff cover cleaned inside and out, a new gasket installed, and the diff cover installed ready for fluid under the truck. I don't know what the info stamped on the ring gear means, but I hope it means the same thing the tag on the diff says, that there is 3.55 gears installed.


I have to work again tomorrow (24 hours), hopefully the last 2 parts I am waiting for arrive then (track bar bracket & driver side u-bolt plate). Saturday, unless I have a long incident Friday night or Saturday morning, the swap will happen. More to come then.
Got the spindles off. AutoZone has a nifty tool that screws on the spindle and a slide hammer that beats the spindle off. As tight as they were on there, there was no other way to get it off. Once they were off, a TON of anti-seize went back before the spindle did. The old dust shields were rotton, so they came off for good. I also got a nice new set of MileMarker Supreme lockouts. With the new bearings installed in the freshly turned rotors, the hubs/rotors, and lockouts got installed. I also got the track bar bracket straightened.
I also got the center section cleaned out, diff cover cleaned inside and out, a new gasket installed, and the diff cover installed ready for fluid under the truck. I don't know what the info stamped on the ring gear means, but I hope it means the same thing the tag on the diff says, that there is 3.55 gears installed.
I have to work again tomorrow (24 hours), hopefully the last 2 parts I am waiting for arrive then (track bar bracket & driver side u-bolt plate). Saturday, unless I have a long incident Friday night or Saturday morning, the swap will happen. More to come then.
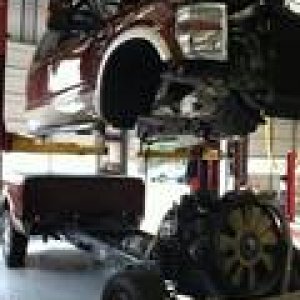
Progress.
The old TTB came out VERY easy. I was shocked how easy all the bolts came lose. I had it out in less than an hour. I only had to cut 1 u-bolt, so I will only have to replace that 1. Since I just put new u-bolts on in the summer when I did the add-a-leaf.


The hardest part was getting the bolts on the top of the cross member that held the TTB brackets on. I had to cut them to get them to clear the oil pan.


The new axle slid in and mated up to the springs with ease. Took about 30 minutes to get it all in and buttoned up, all except for 1 u-bolt. I am very impressed with how it looks in there. I can't wait till I get it on the road. It is setting on its own weight now with the jack stands under the axle. The new u-bolt will be here Wednesday.


The old TTB came out VERY easy. I was shocked how easy all the bolts came lose. I had it out in less than an hour. I only had to cut 1 u-bolt, so I will only have to replace that 1. Since I just put new u-bolts on in the summer when I did the add-a-leaf.
The hardest part was getting the bolts on the top of the cross member that held the TTB brackets on. I had to cut them to get them to clear the oil pan.
The new axle slid in and mated up to the springs with ease. Took about 30 minutes to get it all in and buttoned up, all except for 1 u-bolt. I am very impressed with how it looks in there. I can't wait till I get it on the road. It is setting on its own weight now with the jack stands under the axle. The new u-bolt will be here Wednesday.
genuineford
New member
Did you leave the TTB springs in there or replace them with some springs from a solid axle?
I am using the TTB springs for now.Did you leave the TTB springs in there or replace them with some springs from a solid axle?
genuineford
New member
Ok then you aware it will ride like crap until you get different springs.
You are not the first to say that.Ok then you aware it will ride like crap until you get different springs.
I am also aware that it isn't a car, but a 1 ton truck that is 15 years old, so I don't expect it to ride like a new 1 ton does.
Got her on the ground with tires on it. I got all the steering on and the tires somewhat in alignment so I can drive it to the shop I use for alignments tomorrow afternoon.
I gained 1" exactly overall height from the TTB with the F-250 springs and add-a-leafs to the Dana 60 with the same F-250 springs with add-a-leafs. I will remeasure after I drive it tomorrow and see if they settle any. I don't think they will.
I am still waiting on the 1 u-bolt to get in tomorrow.
The only thing left to do is install the u-bolt, fill the diff with gear oil, and grease the chassie components (tie rods & ball joints).
Got everything buttoned up and done. It drives great and doesn't ride as bad as everyone made it out to be with the F-250 leafs.
With my rough alignment last night, I was within 5* on the toe and 30* on the steer straight. I had it aligned by a shop today.
I love this truck now.


This is the '89 F-350 that I had setting in the driveway to see how the front suspension was together.

A few more pictures after I got home from the alignment shop today.


With my rough alignment last night, I was within 5* on the toe and 30* on the steer straight. I had it aligned by a shop today.
I love this truck now.
This is the '89 F-350 that I had setting in the driveway to see how the front suspension was together.
A few more pictures after I got home from the alignment shop today.
DieselFreak92
New member
What size tires? Amazing looking truck!
They are 285/75/16's. Thanks.What size tires? Amazing looking truck!